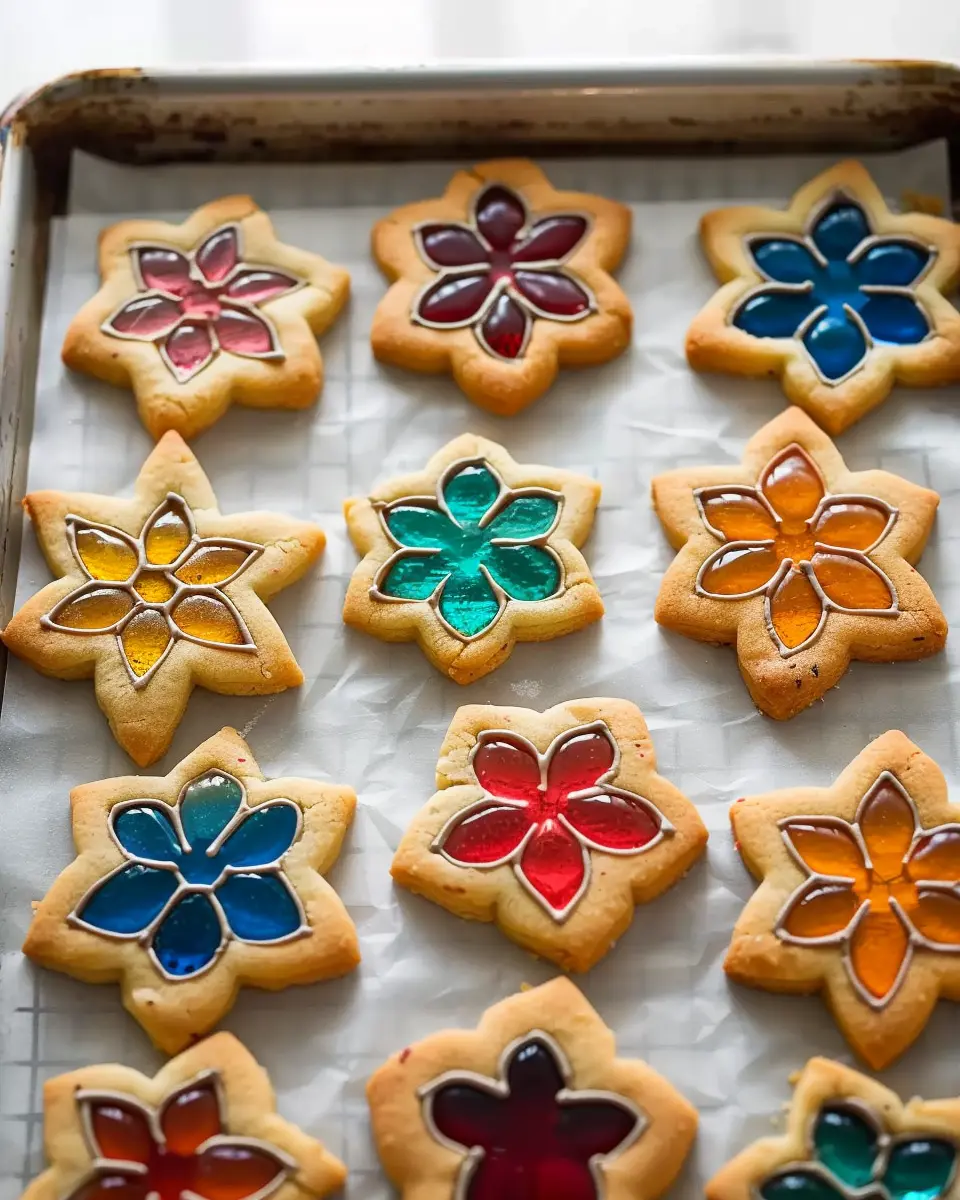
Introduction to Stained Glass Cookies
When it comes to baking, creativity knows no bounds, and stained glass cookies are a beautiful testament to that idea. These delightful treats are not only a feast for the taste buds but also a feast for the eyes. Crafted from colorful hard candies melted within a cookie dough frame, they look strikingly similar to actual stained glass windows you’d find in a cathedral. So, what makes stained glass cookies so special?
A Whimsical Treat
Stained glass cookies are essentially a playful twist on traditional sugar cookies. The vibrant colors that shine through create an artistic masterpiece on your dessert table. They’re perfect for holiday gatherings, birthday parties, or any occasion where a little whimsy is welcome. Kids and adults alike find joy in these visually stunning cookies, making them a hit among guests of all ages.
But beyond their aesthetic appeal, these cookies are also surprisingly easy to make! With just a few simple ingredients—flour, butter, sugar, and colorful candies—you can whip up a batch that will surely impress. If you’re interested in exploring visually appealing recipes, check out the Recipe Archive for more inspiration.
Homemade vs. Store-Bought
While you might find pre-made options at the store, nothing beats the experience of baking these cookies at home. The aroma of freshly baked cookies wafting through your kitchen is unrivaled, and the excitement of creating something unique with your hands enhances the overall experience. Moreover, when you make your own stained glass cookies, you can customize the flavors and colors, turning them into a reflection of your personality.
A Little Science in the Kitchen
Did you know that the melting candies create a fascinating chemical reaction when baked? The sugars caramelize, giving your cookies that shiny, glass-like finish. It’s not just baking; it’s also a bit of science! This transformation is not only delightful to watch but also makes your cookies unique every time you bake them. The possibilities are endless, allowing you to experiment with different shapes, colors, and flavors.
So, why not bring a little art into your baking? Try your hand at making stained glass cookies, and watch how they light up any occasion! With each bite, you’ll enjoy a blend of textures and flavors, making them a delightful addition to your dessert repertoire.
Ingredients for Stained Glass Cookies
Baking stained glass cookies is not just about the vibrant appearance; it’s also about the delightful flavors coming together. Here’s what you’ll need to create these beautiful treats that are perfect for any occasion.
Essential Ingredients for Delicious Cookies
To whip up a batch of stained glass cookies, gather the following essential ingredients:
- Butter: 1 cup, unsalted, softened. This will give your cookies a rich flavor and a tender texture.
- Sugar: 1 cup, granulated. This sweet component balances the dough and helps the cookies spread.
- Eggs: 1 large egg. Not only does it add moisture, but it also binds the ingredients together.
- Vanilla Extract: 1 teaspoon. A splash of vanilla enhances the overall flavor.
- Flour: 2 ¾ cups, all-purpose. This forms the bulk of your dough.
- Baking Powder: 1 teaspoon. This helps the cookies rise to perfection.
- Salt: A pinch, to enhance flavor profiles.
- Hard Candies: Different colors, crushed. These candies will create the beautiful stained glass effect.
For more tips on cookie variations, check out Baking Basics. It’s a great resource for every cookie lover!
Remember, the quality of your ingredients—especially the butter and vanilla—can make a big difference. So, go for the good stuff!
Step-by-step Preparation for Stained Glass Cookies
Baking stained glass cookies is a delightful, creative process that results in eye-catching treats sure to impress friends and family alike. It’s both a fun activity for kids and a great way for adults to get crafty in the kitchen! Below, I’ll walk you through the preparation step-by-step, ensuring you leave with a beautiful batch of stained glass cookies.
Preheat and prepare your baking sheets
Start by preheating your oven to 350°F (175°C). It’s essential to have this step finished before you start baking, as this helps the cookies to bake evenly. Meanwhile, line two baking sheets with parchment paper. This not only aids in easy cookie removal but also helps avoid any sticking. Make sure any leftover cookie crumbs from previous baking adventures are cleared out so your delicious stained glass cookies have a pristine space to shine!
Cream the butter and sugars
In a large mixing bowl, mix together softened butter (1 cup) and sugar (1 cup white sugar and 1/2 cup brown sugar). Creaming the butter and sugars takes about 2-3 minutes using an electric mixer. You’re aiming for a light and fluffy mixture. If you’ve ever wondered why this step is crucial, it’s because it incorporates air into the batter, creating delightful texture in your cookies.
Mix in the molasses and vanilla
Now, it’s time to add some flavor! Mix in 1/4 cup of molasses and 1 teaspoon of vanilla extract. Blend well until fully combined. Molasses not only provides sweetness but also adds a beautiful depth of flavor. If you’re eager to learn about the different types of molasses, check out this molasses guide for some fascinating insights!
Combine dry ingredients
In a separate bowl, whisk together 2 cups of all-purpose flour, 1 teaspoon of baking soda, and 1/2 teaspoon of salt. Gradually add these dry ingredients to the wet mixture, mixing until just combined. Be careful not to overmix; otherwise, your cookies might turn out tough. Trust me, no one wants that!
Chill the dough for best results
Once your dough is ready, wrap it in plastic wrap and refrigerate for at least 1 hour. Chilling helps the flavors meld together and makes the dough easier to roll out. Waiting might be the hardest part, but it’s worth it! You could use this time for a quick coffee break or to binge-watch an episode of your favorite series.
Crush your hard candies
While the dough chills, it’s time to prepare your colorful filling. Grab your favorite hard candies, such as Jolly Ranchers, and place them in a plastic bag. Use a rolling pin or meat mallet to crush them into tiny pieces. Aim for a mix of coarse and fine pieces to achieve that enchanting stained glass effect.
Roll out the dough
After chilling the dough, take it out and let it sit for about 10 minutes at room temperature. This will make it easier to roll out. On a floured surface, roll the dough to about 1/4-inch thickness. If the dough sticks, don’t hesitate to sprinkle some additional flour on it or your rolling pin.
Cut cookie shapes
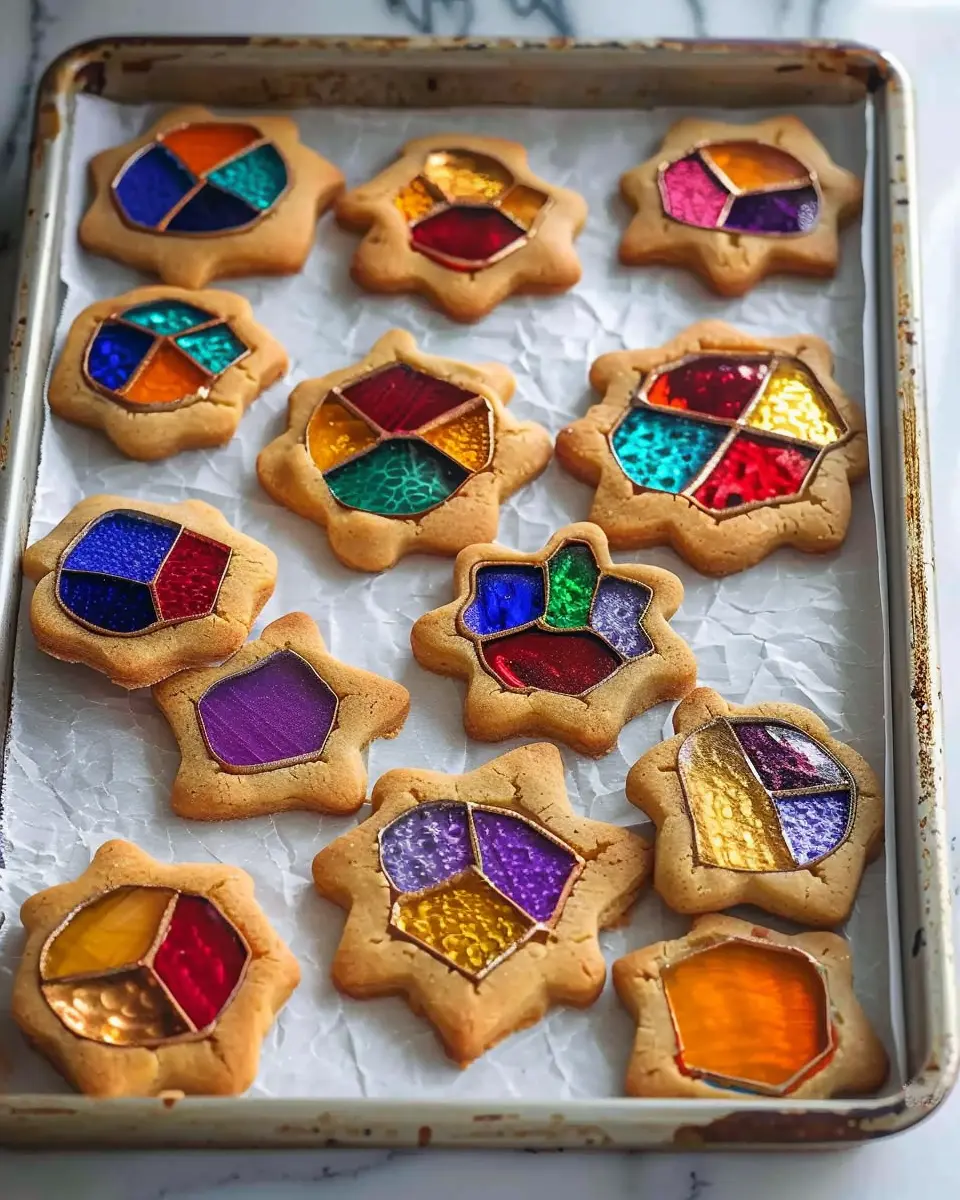
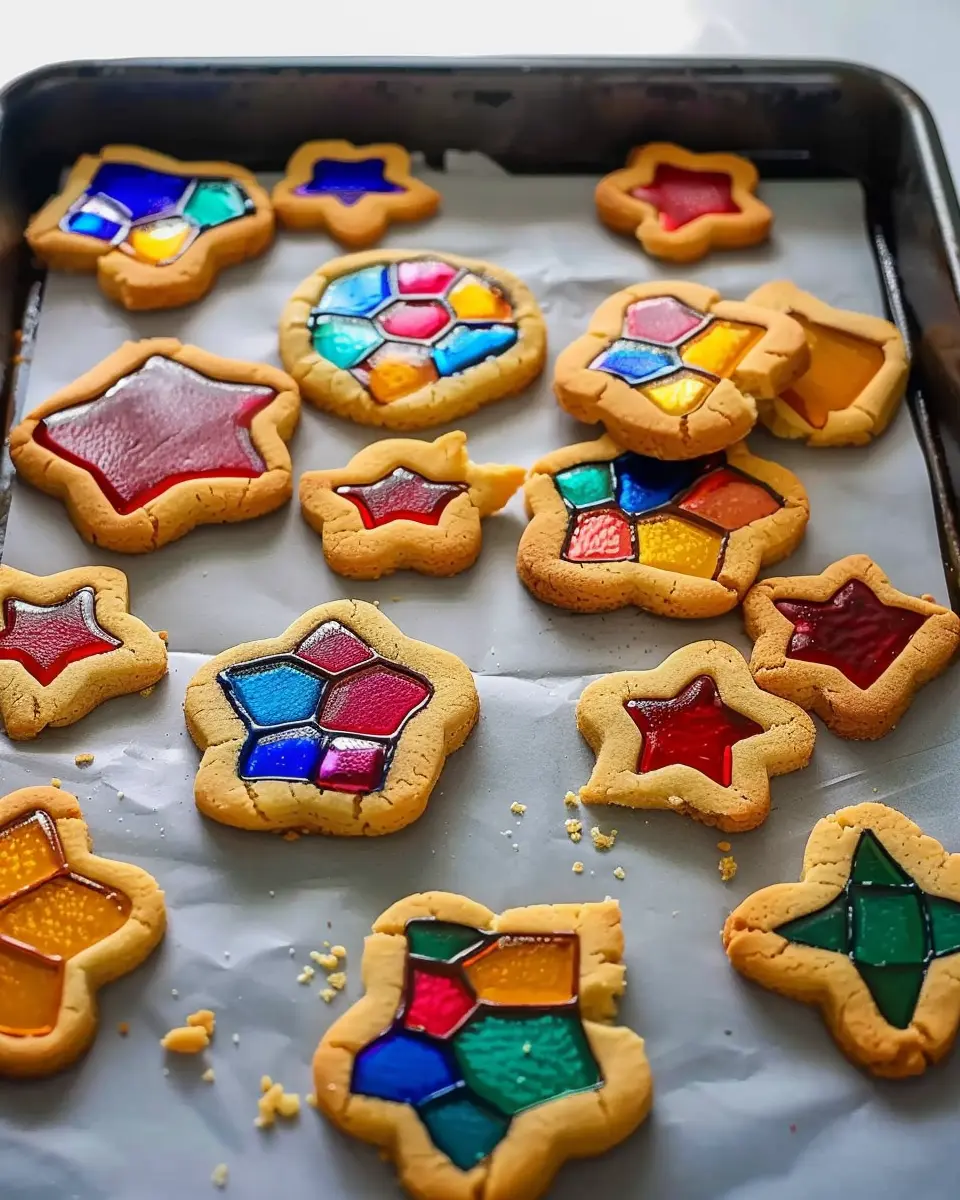
Using cookie cutters, cut out shapes from the rolled-out dough. This is where the fun begins! You can create festive shapes—stars, hearts, or even geometric designs. Remember, you’ll need to make two cuts for each cookie: one for the main shape and one smaller shape in the center for the “glass.”
Fill with crushed candies
Carefully transfer the cookies to your prepared baking sheets and fill the center cutouts with your crushed candy mixture. Don’t overfill; a level scoop works best so the candy won’t overflow while baking.
Bake your cookies to perfection
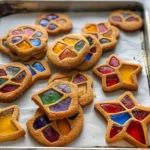
Pop your cookies into the oven and let them bake for 8-10 minutes. Keep an eye on them—when the edges start to turn golden brown and the candies begin to melt, you’ll know they’re ready. Allow them to cool on the baking sheets for a few minutes before transferring them to a wire rack. Enjoy the captivating sight of melted, vibrant candy filling, resembling a beautiful piece of stained glass!
Embarking on this sweet adventure will certainly create a charming addition to any gathering and will surely impress your friends and family. Happy baking!
Variations on Stained Glass Cookies
Stained glass cookies are a delightful treat that can easily evolve to fit your taste preferences and dietary needs. Let’s explore a few fun adaptations that will elevate your cookie-baking game!
Exploring Different Flavors & Colors of Hard Candies
When it comes to filling your stained glass cookies, the possibilities are as vibrant as your imagination! While traditional recipes often use clear or red candies, why not experiment?
- Flavors: Try sour candies for a tangy twist or a combination of fruit flavors like blue raspberry and orange for a seasonal effect.
- Colors: Mixing yellow and green candies gives your cookies a fresh, cheerful look—ideal for spring or summer gatherings.
Check out this guide for more inspiration on color combinations!
Delicious Gluten-Free Stained Glass Cookies
For those with gluten sensitivities, it’s easy to make gluten-free stained glass cookies without sacrificing taste. Use a cup-for-cup gluten-free flour substitute to create your dough. Be sure to check that your hard candies are also gluten-free, as some brands may contain hidden gluten.
Personal experience has shown me that using a mix of almond flour can add a lovely, nutty flavor that pairs well with the sweetness of the candy. Isn’t it wonderful how adapting recipes to suit different diets can lead to surprising and delightful results?
With a touch of creativity and a willingness to try new ingredients, your stained glass cookies can shine like never before!
Baking Tips and Notes for Stained Glass Cookies
Achieving the perfect cookie texture
When making stained glass cookies, the goal is to achieve a crisp edge with a lovely chewy center. Here are some tips to help you master it:
- Use cold butter: Softened butter is often a cookie’s downfall. Stick with cold butter for that ideal texture.
- Chill your dough: After mixing, let your dough rest in the refrigerator. This helps firm up the butter and prevents spreading.
- Avoid overbaking: Take your cookies out of the oven when they’re still slightly soft in the center; they will continue to set as they cool.
Common mistakes to avoid
Even seasoned bakers can stumble on a few pitfalls. Keep these in mind to make your stained glass cookies the talk of the party:
- Ignoring the dough’s temperature: Not chilling the dough can lead to flat cookies.
- Inadequate cutting: Be precise when cutting out the center shapes; uneven edges can affect the final look.
- Not using quality candy: The candies melted in the center should be vibrant and high-quality for a beautiful finish.
For further inspiration on cookie-making techniques, check out resources like New York Times Cooking or Serious Eats. Happy baking!
Serving Suggestions for Stained Glass Cookies
Presentation ideas for parties
When hosting a gathering, presenting your stained glass cookies beautifully can set the right tone. Consider using a tiered dessert stand to showcase these colorful treats. Arrange them by color for a stunning visual display, or mix them in with other festive pastries. Adding some fresh greenery or seasonal decorations around the plate can elevate the presentation even more. A sprinkle of powdered sugar can mimic snow, making them perfect for winter events.
Creative ways to package for gifts
If you’re looking to gift your stained glass cookies, think outside the box! Clear cellophane bags tied with a colorful ribbon make for an attractive presentation. You might also consider using decorative tins or boxes, which not only look great but keep cookies fresh. For a personalized touch, include a handwritten recipe card or a sweet note. On that note, if you’re eager to delve deeper into cookie gifting ideas, this guide can be a great resource!
Whether for a celebration or a thoughtful gift, your stained glass cookies will surely impress!
Time Breakdown for Stained Glass Cookies
Understanding the time involved in making stained glass cookies is essential for effective planning. Here’s how the timing breaks down:
Preparation time
First things first, you’ll need about 30 minutes to gather your ingredients and mix the cookie dough. It’s all about getting that perfect blend!
Chilling time
Once your dough is ready, it will need to chill for approximately 1 hour. This step is crucial for easier rolling and shaping. Why not use this time to catch up on a podcast or prep your baking sheets?
Baking time
Baking the stained glass cookies typically takes around 8–10 minutes. Keep an eye on them; you want a golden edge but a soft center.
Total time
In total, you’re looking at about 2 hours for the entire process, including prep, chill, and bake. Not too shabby for such delightful cookies!
For more tips on cookie baking, check out resources like King Arthur Baking or The Cookie Rookie. Happy baking!
Nutritional Facts for Stained Glass Cookies
Calories per cookie
Stained glass cookies are not just a visual treat; they also come with their own unique nutritional profile. Each cookie contains approximately 100 calories, making them a delightful but mindful option for your sweet cravings.
Sugar content
It’s important to note that these cookies do have a sweet side. With around 10 grams of sugar per cookie, they are best enjoyed in moderation. For those interested in cutting back on sugar, consider using natural sweeteners or sugar alternatives that won’t compromise that indulgent taste.
Suggested serving size
Typically, a serving size of 2-3 stained glass cookies serves up the perfect balance of flavor and satisfaction. They make great contributions to holiday gatherings, parties, or even a cozy night in! You can find more tips on serving sizes for cookies at trusted resources like the U.S. Department of Agriculture.
Incorporating these cookies into your diet doesn’t have to be a guilt trip. Just remember to savor each bite, and you might be pleasantly surprised at how they can delight your taste buds without derailing a balanced diet!
FAQs about Stained Glass Cookies
When diving into the colorful world of stained glass cookies, questions can arise. Here’s a friendly rundown of the most common queries to help you navigate your baking adventure!
How do I prevent the cookies from spreading?
Nobody wants a puddle of cookie! To keep your stained glass cookies in their intended shape, follow these tips:
- Chill Your Dough: After mixing, let your cookie dough chill in the fridge for at least 30 minutes. Chilling solidifies the fats, resulting in less spreading.
- Use Parchment Paper: Bake the cookies on parchment paper, which helps maintain their shape and prevents sticking.
- Optimal Oven Temperature: Make sure your oven is preheated to the correct temperature, typically around 350°F. An accurate thermometer can be a game-changer!
What hard candies work best for these cookies?
For that eye-catching stained glass effect, clear candies work wonders. Here’s a quick list:
- Jolly Ranchers: Their vibrant colors and clear finish create stunning results.
- Life Savers: Both the regular and gummy versions melt well.
- Crushed Hard Candies: Whatever your sweet tooth fancies can work too; just ensure they’re clear!
Check out more options at sources like Candy Warehouse for a variety of choices.
Can I decorate stained glass cookies post-baking?
Absolutely! Once your cookies cool, feel free to unleash your creativity. Use royal icing or fondant to add personal touches or festive designs. Remember, a fine tip on your icing bag helps with precision, allowing for delicate designs.
Baking equips you with delightful culinary experiences, and stained glass cookies are no exception. Enjoy the process, and don’t hesitate to share your creations with friends!
Conclusion on Stained Glass Cookies
Why You Should Try Making Stained Glass Cookies at Home
Making stained glass cookies at home is a delightful adventure. Not only do they bring a splash of color to any gathering, but they also allow you to unleash your creativity in the kitchen. The process is fun, inviting friends or family to join in enhances the joy, and the end product will leave a lasting impression. Plus, baking these cookies is a fantastic way to learn about cookie decorating techniques.
For those looking for a unique gift or a fun dessert to share, stained glass cookies are sure to impress. So, gather some ingredients, invite your loved ones, and enjoy the magic of creating something truly special! For more baking tips, check out Food Network or BBC Good Food.
Stained Glass Cookies: Easy Recipe for Festive Fun at Home
Make festive stained glass cookies that are fun and easy to decorate!
- Prep Time: 30 minutes
- Cook Time: 10 minutes
- Total Time: 1 hour
- Yield: 24 cookies 1x
- Category: Dessert
- Method: Baking
- Cuisine: American
- Diet: Vegetarian
Ingredients
- 2 ¾ cups all-purpose flour
- 1 teaspoon baking powder
- 1 cup unsalted butter, softened
- 1 cup granulated sugar
- 1 large egg
- 1 teaspoon vanilla extract
- 1 cup crushed hard candies (for stained glass effect)
Instructions
- Preheat your oven to 350°F (175°C).
- In a bowl, mix together the flour and baking powder.
- In another bowl, cream together the butter and sugar until light and fluffy.
- Add the egg and vanilla extract, mixing until well combined.
- Gradually add the flour mixture to the wet ingredients until a dough forms.
- Chill the dough for at least 30 minutes.
- Roll out the dough and cut into desired shapes.
- Cut out shapes from the center of each cookie and fill with crushed hard candies.
- Bake for 8-10 minutes until the edges just start to brown.
- Allow cookies to cool before serving.
Notes
- For best results, use a variety of colored hard candies.
- Experiment with different shapes for special occasions.
Nutrition
- Serving Size: 1 cookie
- Calories: 120
- Sugar: 8g
- Sodium: 50mg
- Fat: 7g
- Saturated Fat: 4g
- Unsaturated Fat: 2g
- Trans Fat: 0g
- Carbohydrates: 15g
- Fiber: 0g
- Protein: 1g
- Cholesterol: 30mg
Keywords: Stained Glass Cookies, festive cookies, holiday treats