Introduction to Halloween Chocolate Bark
What is Halloween Chocolate Bark?
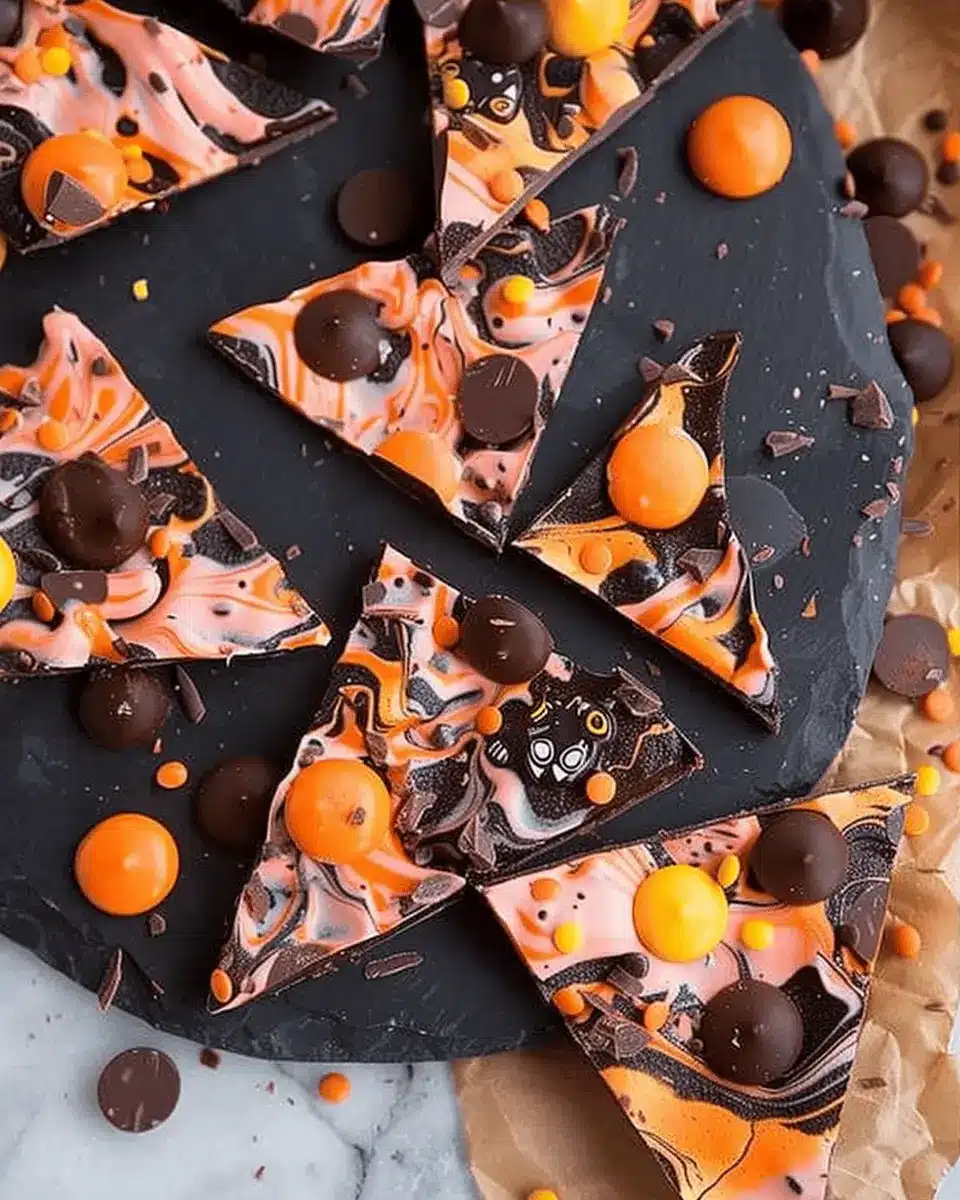
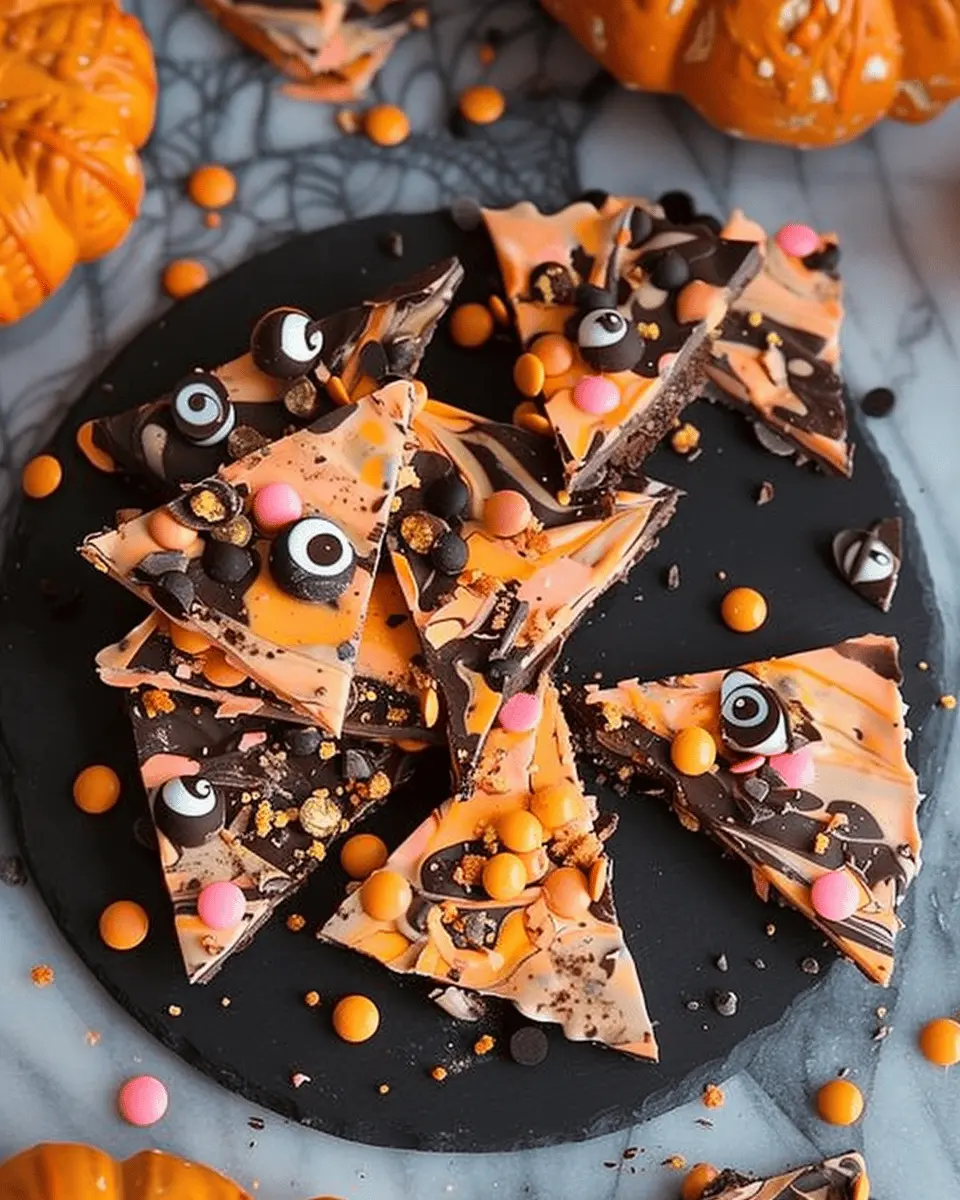
When you think of delightful Halloween treats, Halloween chocolate bark is sure to come to mind. This delicious confection is a simple yet festive combination of melted chocolate poured into a pan and topped with all sorts of fun ingredients. From spooky sprinkles to colorful candies, the options are nearly limitless! Typically made with a mix of dark, milk, or white chocolate, this sweet treat is both a feast for the eyes and a delight on the palate. The best part? You can easily customize it to reflect the personality of your spooky celebrations! Whether you’re throwing a Halloween party or simply indulging in some seasonal fun, making your own chocolate bark can transform plain chocolate into a fun, eye-catching treat.
Why Homemade is the Way to Go
While store-bought options abound, there’s nothing quite like the satisfaction of creating your Halloween chocolate bark at home. Here are a few reasons why going the homemade route is a fantastic idea:
- Customization: You can choose your favorite types of chocolate and toppings that suit your taste. Think turkey bacon bits for a savory twist or candy corn for a classic Halloween flair. The possibilities are endless!
- Quality Control: When making your own treats, you control the ingredients. Want to use organic chocolate or add fewer sweets? Easy! Shopping for high-quality chocolate chips or unique toppings can lead you to excellent alternatives like those found in this guide from Serious Eats.
- Experience & Fun: Making chocolate bark can be an enjoyable activity to share with friends or family. Just imagine the laughter and creativity that unfolds as everyone gets involved in the decorating process!
Preparing your own Halloween chocolate bark allows you to embrace the spirit of the season while crafting treats that are uniquely yours. So grab your chocolate, gather your favorite toppings, and let’s get started on this sweetly spooktacular adventure!

Ingredients for Halloween Chocolate Bark
Essential ingredients for your bark
Making Halloween chocolate bark is a delightful process that requires just a few key ingredients. First, you’ll need:
- Chocolate: Use your favorite kind—dark, milk, or white chocolate works beautifully.
- Candy Corn: This colorful treat adds a festive touch that’s iconic during Halloween.
- Sprinkles: Choose Halloween-themed sprinkles to add an extra pop of color.
- Nuts: Chopped almonds or walnuts can add a nice crunch.
These ingredients will create a great base for your bark, making it both delicious and visually appealing.
Optional ingredients for personalization
Now, let’s talk about personalization! Feel free to get creative with your Halloween chocolate bark. Here are some optional ingredients you might consider adding:
- Dried Fruit: Cranberries or apricots can provide a tasty contrast to the sweetness.
- Mini Marshmallows: They add a fun gummy texture!
- Turkey Bacon or Chicken Ham: For a surprising savory twist, try crumbling some cooked turkey bacon or chicken ham on top.
- Crushed Candy Bars: Chop up your favorite chocolate bars for added flavor and fun.
With these options, you can tailor your Halloween chocolate bark to suit your taste, making every batch uniquely yours. Plus, experimenting with various ingredients is half the fun! For more inspiration on chocolate pairings, check out Serious Eats.
Preparing Halloween Chocolate Bark
If you’re looking for a fun and festive treat this spooky season, Halloween chocolate bark is a fantastic choice! This easy-to-make candy can be customized with all sorts of colorful toppings, making it not only delicious but also an eye-catching party platter addition. Let’s walk through the steps to create your very own batch of Halloween magic!
Gather your materials
Before you dive into making your bark, it’s essential to assemble all the materials you’ll need. Here’s what you should have on hand:
- Chocolate: You can use milk, dark, or white chocolate, depending on your preference. For a vibrant touch, try adding colored melting wafers.
- Toppings: Think Halloween! Go for candy corn, gummy worms, pumpkin sprinkles, chocolate-covered pretzels, or even mini marshmallows.
- Parchment paper: This will help your bark release easily once set.
- Baking tray: A shallow baking tray or a cookie sheet works perfectly.
- Microwave-safe bowl: For melting chocolate.
- Spatula: To spread the melted chocolate evenly.
Getting all your materials together will streamline your process, letting you focus on the creative fun. You might want to look into stores like Michaels or Walmart for a variety of toppings if you need inspiration.
Line your tray
Take that baking tray and line it with parchment paper. This step might seem trivial, but it’s crucial! The parchment paper prevents the chocolate from sticking to the tray, ensuring that your Halloween chocolate bark comes out neatly. Plus, it makes cleanup a breeze. Be sure to smooth out any wrinkles in the parchment to create an even surface for pouring the chocolate.
Melt the chocolate
Now for the exciting part: melting the chocolate! Place your chocolate in the microwave-safe bowl and microwave it in 30-second intervals. Mix in between intervals to ensure even melting. Depending on your microwave, it could take anywhere from 1 to 3 minutes to achieve a smooth, melted consistency. Be careful not to overheat; burnt chocolate can ruin your creation! If you’re looking for tips on melting chocolate effectively, check out resources from Serious Eats.
Add color and mix
If you want to get playful with your Halloween chocolate bark, this is the time to incorporate color! For white chocolate, you can add a few drops of food coloring to create vibrant shades. Stir it in gently until you achieve your desired hue. If you’re using dark or milk chocolate, you can simply leave it as is for that classic look or use colored melting wafers for brightness.
Pour and decorate
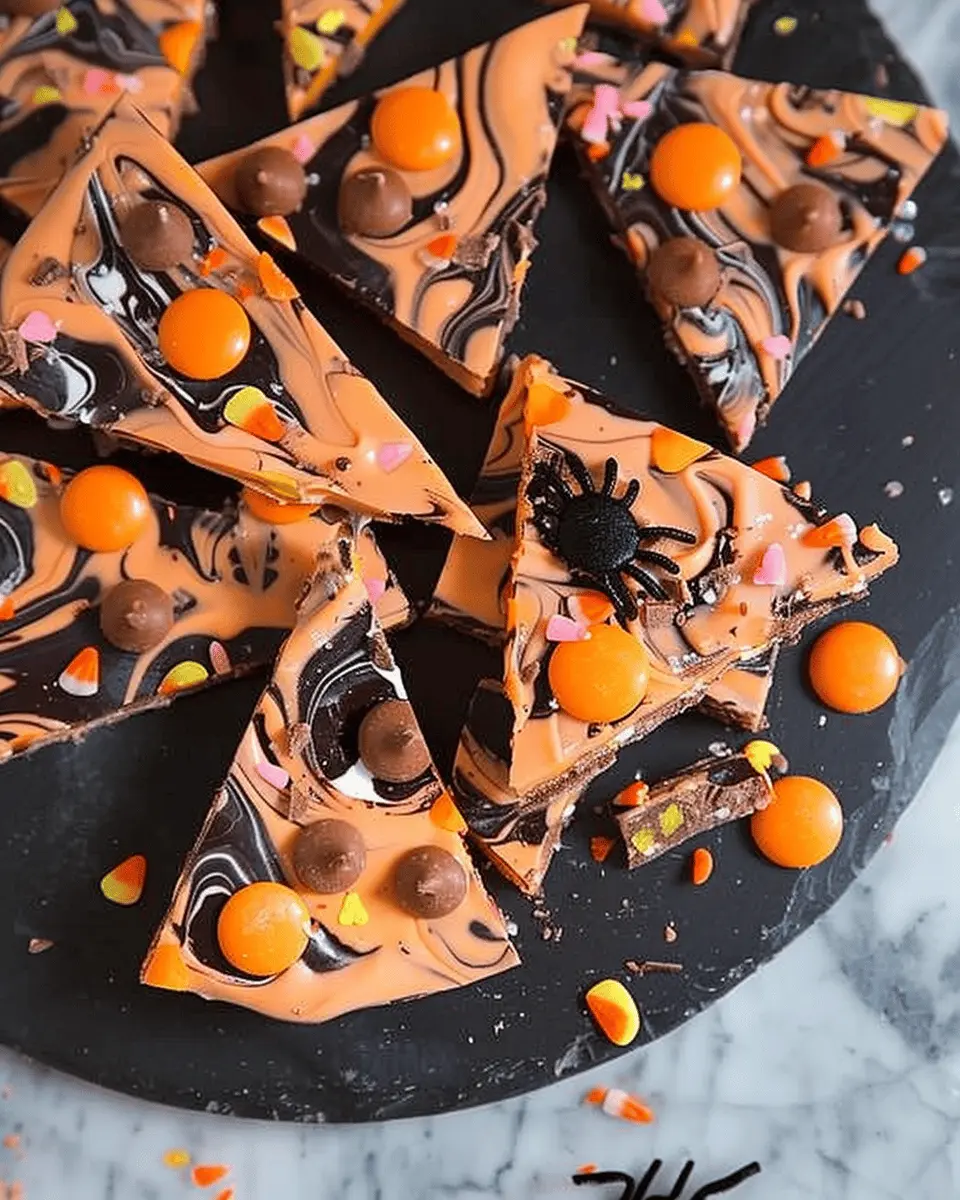
Once your chocolate is melted and you’ve achieved your desired color, carefully pour it onto the lined tray. Using the spatula, spread it out to form an even layer, about 1/4 inch thick. Now comes the fun part! Sprinkle your colorful toppings generously over the top while the chocolate is still warm. Feel free to get creative here—mix and match your favorite toppings for a spooky surprise!
Set and serve
Now, it’s time for the chocolate to set! Place your decorated tray in the refrigerator for about 30 minutes. Once it’s completely firm, remove it and break it into pieces. Serve your beautiful Halloween chocolate bark on a platter, or package it in clear bags tied with orange ribbon for a perfect treat for friends or coworkers. And if you have any leftovers (which is a big if!), store them in an airtight container to keep them fresh.
There you have it—a wonderfully festive treat that’s both delicious and perfect for the Halloween season. This Halloween chocolate bark creation is sure to impress any group of ghouls and goblins! So whip up a batch, grab your favorite fall drink—perhaps a warm apple cider— and enjoy the sweet spirit of Halloween!
Variations on Halloween Chocolate Bark
Exploring fun variations on your Halloween chocolate bark not only elevates the festive spirit but also caters to a variety of taste buds. Let’s dive into some spooky yet delicious alternatives that you can whip up in no time!
Spooky Pumpkin Spice Bark
Embrace the flavors of fall with this spooky pumpkin spice bark. Start with a base of creamy milk chocolate or rich dark chocolate, and add a sprinkle of pumpkin spice and crushed graham crackers on top. This crunchy, sweet, and subtly spiced treat will have everyone reminiscing about pumpkin patches and cozy autumn evenings. You can make it extra festive by drizzling some white chocolate to create ghostly swirls.
Ghostly White Chocolate Bark
For a simply haunting treat, try your hand at ghostly white chocolate bark. Melt down white chocolate chips, and while it’s still warm, add mini marshmallows as “ghosts.” Use black food coloring or edible markers to create eyes on each marshmallow. The result is a light and fun bark that’s as delightful to eat as it is to admire. Plus, white chocolate adds that creamy balance that perfectly complements Halloween flavors. For more white chocolate inspiration, don’t forget to check out sources like Food Network.
Nutty Halloween Bark
If you’re looking for something a bit more substantial, nutty Halloween chocolate bark is a perfect pick. Mix a combination of dark chocolate, chopped almonds, pumpkin seeds, and even some dried cranberries or cherries for a pop of color. The nuts add a lovely crunch while the fruit brings a touch of zest, making it a well-rounded treat that’s perfect for snacking during your Halloween festivities.
Feel free to mix and match these ideas—after all, creating your own Halloween chocolate bark can be just as fun as indulging in it!
Cooking Tips and Notes for Halloween Chocolate Bark
Best Practices for Melting Chocolate
Melting chocolate can be tricky, but with a few tips, you’ll have smooth and delicious Halloween chocolate bark in no time! Always use high-quality chocolate; consider options like dark, milk, or white chocolate based on your preference. Here’s how to melt it perfectly:
- Use a Double Boiler: This method gives you more control over the heat. Just make sure the bowl doesn’t touch the water to prevent scorching.
- Microwave Option: If you’re short on time, heat chocolate in 30-second intervals, stirring in between until smooth.
- Temperature Control: Keep the chocolate at a low temperature to avoid seizing, ideally around 104°F to 113°F (40°C to 45°C).
How to Avoid a Sticky Mess
Chocolate can get messy, but you can keep it neat! Here are a few pointers:
- Work on a Non-Stick Surface: Use parchment paper or a silicone mat to pour your Halloween chocolate bark. It makes for easy cleanup!
- Let It Cool Properly: Once poured, allow the bark to cool completely at room temperature before cutting—it will set more evenly.
- Clean Tools Promptly: Wash your utensils as soon as you’re done to prevent chocolate from hardening on them.
In case you want to delve deeper into chocolate melting techniques, check out this comprehensive guide from Cooking Classy. Happy cooking!
Serving suggestions for Halloween Chocolate Bark
Creative Presentation Ideas
When it comes to serving your Halloween chocolate bark, creativity is the way to go! Instead of just plating it, consider cutting the bark into playful shapes using cookie cutters. Ghosts, bats, and pumpkins can make for an eye-catching display. You can also pile the pieces in a whimsical cauldron or a decorative bowl to add a thematic touch to your table setting. Another fun idea is to drizzle contrasting chocolate over the top for an artistic flair.
Festive Pairing Ideas for Gatherings
Pair your Halloween chocolate bark with festive treats that complement its flavors. Consider serving it alongside:
- Scoops of pumpkin spice ice cream for a spicy contrast.
- Fresh fruit skewers like strawberries and bananas to balance the sweetness.
- Hot chocolate or coffee—the warmth of these beverages perfectly offsets the chilly snap of the bark.
For extra inspiration, explore sites like Taste of Home or Food Network for complementary recipes that will elevate your gathering. These ideas not only enhance flavor, but they can also spark conversation and create a memorable experience!
Time breakdown for Halloween Chocolate Bark
Preparation time
Whipping up your Halloween chocolate bark is a breeze! You’ll need about 15 minutes for preparation. This includes gathering your ingredients, melting your chocolate, and mixing in those delightful spooky toppings like candy corn or festive sprinkles.
Cooking time
Cooking time is minimal, as the chocolate only needs about 5-10 minutes in the heat to melt to a wonderfully gooey consistency. It’s hands-off and allows you to sip on your favorite warm beverage while waiting.
Total time
In total, you’re looking at roughly 25-30 minutes from start to finish. Afterward, just let your Halloween chocolate bark cool in the fridge for about 30 minutes before diving in. Perfect for entertaining or enjoying a sweet treat at home!
For more insights on chocolate melting techniques, check out Serious Eats for expert tips!
Nutritional facts for Halloween Chocolate Bark
When you’re enjoying your Halloween chocolate bark, it’s good to know what you’re indulging in. Let’s break it down!
Calories per serving
Each piece of this delightful bark packs around 150 calories. While it can be tempting to indulge, moderation is key—especially during a season filled with sweet treats.
Sugar content
This tasty treat contains approximately 12 grams of sugar per serving. It’s advisable to be mindful of your intake, but the joy of sharing this sweet delight can make it worthwhile. If you’re interested in reducing sugar, consider using dark chocolate with a higher cocoa content for a delicious alternative.
Potential allergens
Always keep an eye out for allergens when enjoying Halloween chocolate bark. Common ingredients like nuts, dairy, and soy can pose risks for those with sensitivities. If you’re making your bark at home, it’s a great idea to source allergen-friendly ingredients or label your creations clearly for your guests. For more detailed information on potential allergens in chocolate and candy, check out resources from the Food Allergy Research & Education.
By being aware of these factors, you can enjoy your Halloween chocolate bark to the fullest while making informed choices!
FAQs about Halloween Chocolate Bark
Creating Halloween chocolate bark is always an exciting and creative endeavor! If you’re diving into this spooktacular treat, you might have a few questions. Let’s tackle some of the most common queries!
Can I use different types of chocolate?
Absolutely! While dark chocolate is a classic choice for Halloween chocolate bark, you can easily mix and match. Consider using milk chocolate for a creamier texture or white chocolate for a striking contrast. You can even experiment with flavored chocolates—like caramel or mint—to elevate your creation. The key is to melt whatever chocolate you choose carefully to maintain its smooth texture. For help on melting chocolate, check out this great guide here.
How long does it last?
Once your Halloween chocolate bark is made, it can be stored for up to two weeks at room temperature. To ensure freshness, wrap it snugly in wax paper or place it in an airtight container. If you live in a hot climate, it’s best to keep it in the fridge for longer-lasting flavor and crunchiness. Just remember to let it sit at room temperature for a bit before enjoying!
What can I substitute for the M&Ms?
If you’re looking to switch things up, there are plenty of fun alternatives to M&Ms! Consider using:
- Halloween-themed sprinkles
- Candy corn for that seasonal touch
- Dried fruits like cranberries or raisins for added chewiness
- Mini marshmallows for a fluffy texture
These options not only look great but also add unique flavors to your Halloween chocolate bark. The possibilities are endless! So, get creative and have fun with your toppings!
Conclusion on Halloween Chocolate Bark
Why you should give it a try this Halloween
As Halloween approaches, there’s something magical about the quirky and sweetly spooktacular nature of Halloween chocolate bark. Not only is it simple to make, but it also allows you to get creative with flavors and toppings. Imagine the delight on your friends’ faces when you present them with this festive treat—perfect for sharing at parties or as a fun snack during a movie night.
Plus, making Halloween chocolate bark is a fantastic way to unwind and let your creativity shine. Did you know that chocolate has been linked to mood enhancement? This makes your bark not just a treat for the eyes, but a treat for the soul too! So, gather your favorite spooky-themed decorations, and let’s make this Halloween one to remember. Check out more Halloween recipes for an even spookier celebration!
Halloween chocolate bark: Fun, Spooky & Sweetly Indulgent Treats
Get into the spooky spirit with this fun and delicious Halloween chocolate bark! It’s the perfect sweet treat for all ages.
- Prep Time: 15 minutes
- Cook Time: 5 minutes
- Total Time: 20 minutes
- Yield: 10 servings 1x
- Category: Dessert
- Method: No-Bake
- Cuisine: American
- Diet: Vegetarian
Ingredients
- 2 cups milk chocolate chips
- 1 cup white chocolate chips
- 1 cup Halloween-themed sprinkles
- 1/2 cup chopped nuts (optional)
- 1/2 cup candy corn
Instructions
- Line a baking sheet with parchment paper.
- Melt the milk chocolate chips in a microwave-safe bowl, stirring until smooth.
- Spread the melted chocolate evenly on the prepared baking sheet.
- Melt the white chocolate chips and drizzle over the milk chocolate.
- Top with sprinkles, chopped nuts, and candy corn.
- Refrigerate until set, then break into pieces.
Notes
- For a more colorful bark, add different types of sprinkles.
- Make sure to keep the chocolate at a low temperature while melting.
Nutrition
- Serving Size: 1 piece
- Calories: 150
- Sugar: 18g
- Sodium: 50mg
- Fat: 8g
- Saturated Fat: 5g
- Unsaturated Fat: 2g
- Trans Fat: 0g
- Carbohydrates: 20g
- Fiber: 0g
- Protein: 2g
- Cholesterol: 5mg
Keywords: Halloween, chocolate bark, spooky treats, sweet treats