Introduction to Easter Pudding Dirt Cups
As Easter approaches, kitchens everywhere begin to fill with festive scents and delightful treats. One of the most fun and whimsical desserts that can grace your table is the Easter Pudding Dirt Cup. But what sparked the idea for this playful dessert?
What’s the story behind Easter Pudding Dirt Cups?
The origins of these clever cups stretch back to the classic dirt cup dessert that many of us enjoyed as children. Traditionally made with crushed cookies, chocolate pudding, and gummy worms to create a fun “dirt” effect, they have evolved over the years. The Easter Pudding Dirt Cup adaptation introduces a springtime flair, swapping out the gummy worms for adorable candy eggs or marshmallow bunnies, making it a perfect fit for the joyous holiday.
The concept combines nostalgia with creativity, allowing for endless customizations. In fact, you can find various interpretations of dirt cups across the internet — from vegan versions using coconut cream to gluten-free options using almond flour. For more insight into similar recipes, sites like Food Network and Serious Eats offer solid foundations and variations to inspire your kitchen experiments.
Why are these treats so popular?
One reason Easter Pudding Dirt Cups have become a staple in many households is their ease of preparation. Picture this: a no-bake dessert that takes just minutes to assemble and can be whipped up the night before your Easter brunch. Plus, they’re an instant hit with both kids and adults alike. The combination of creamy pudding and crumbly “dirt” is not only delicious but also provides a playful element that is perfect for the holiday spirit.
Moreover, these cups offer an opportunity for creative expression. You can involve your friends or family in the process; think of it as a fun art project where everyone can get their hands dirty. Whether you prefer traditional flavors or want to experiment with pastel-colored pudding, the possibilities are endless.
So, are you ready to dive into the delightful world of Easter Pudding Dirt Cups? Stay tuned for the delicious recipe that follows, and let’s make this Easter one to remember!

Ingredients for Easter Pudding Dirt Cups
Creating delightful Easter Pudding Dirt Cups is a fun way to get into the holiday spirit! Let’s break down what you’ll need.
Essential Ingredients for the Pudding
To get started, gather these basic ingredients which form the heart of your delicious Easter treats:
- Chocolate pudding mix: This will serve as the rich, creamy base.
- Milk: Usually, whole milk works best for extra creaminess.
- Crushed Oreos: Serving as the dirt, they add that irresistible crunch.
- Gummy worms (optional but recommended): These are the perfect touch for making your cups look fun and festive!
For a step-by-step guide on making the pudding itself, you might want to check out resources like The Kitchn for expert tips.
Optional Additions for Customization
Feeling creative? Here are some optional ingredients to elevate your Easter Pudding Dirt Cups:
- Whipped cream: A dollop on top makes it heavenly.
- Fruit toppings: Berries can add a refreshing twist.
- Decorative sprinkles: Choose pastel colors to match the Easter theme.
Personalizing your dessert can be a fun way to engage friends or family. Have you tried using different candy or topping combinations? Let us know what works best for you!
Whether you stick to the essentials or explore fun additions, these cups are sure to bring a smile this Easter.
Step-by-Step Preparation of Easter Pudding Dirt Cups
Creating Easter Pudding Dirt Cups is a delightful way to celebrate the season with a fun and delicious dessert. This treat is not only visually appealing, but it’s also surprisingly simple to create. Follow along as we guide you step-by-step through the preparation process, ensuring that you have a delightful dessert perfect for any Easter gathering.
Gather Your Ingredients
Before diving into the fun part of cooking, let’s gather everything you’ll need. Here’s a list of ingredients that will make your Easter Pudding Dirt Cups come to life:
- Chocolate pudding mix (2 boxes)
- Milk (4 cups; as directed on pudding box)
- Whipped topping (one large tub, like Cool Whip)
- Chocolate sandwich cookies (about 20-25, for the “dirt” layer)
- Gummy worms (a must for that authentic dirt effect!)
- Plastic cups (clear ones work best for presentation)
By rounding up these ingredients ahead of time, you’re setting yourself up for success. Plus, it makes the whole cooking process smoother and more enjoyable. If you’re interested in some creative alternatives, consider adding fruit or other types of candy to personalize it!
Prepare the Pudding Mix
Now that you have your ingredients ready, let’s start by preparing the pudding mix.
-
In a large mixing bowl, combine the pudding mix with the milk. Be sure to follow the package instructions for the right proportions and whisk until it’s thoroughly mixed.
-
After mixing, allow the pudding to sit for about 5 minutes. It will thicken up nicely during this time. Did you know? Chocolate pudding is not just delicious, it’s also rich in antioxidants, making it a slightly healthier indulgence if enjoyed in moderation.
Combine the Pudding and Whipped Cream
This step is what truly makes your Easter Pudding Dirt Cups oh-so-creamy and delightful!
-
Once your pudding has set, gently fold in the whipped topping. This process is essential as it lightens the pudding and adds a delightful fluffiness.
-
Make sure to fold rather than stir. This helps retain the airiness of the whipped cream. If you’re feeling adventurous, consider adding a splash of vanilla extract for extra flavor.
Layer the Dirt Cups
This is where the fun really begins! Layering creates the visual appeal that makes these cups a big hit.
-
Start by crushing your chocolate sandwich cookies in a ziplock bag until they resemble dirt. You can also use a food processor for a finer texture.
-
In clear plastic cups, add a layer of the pudding mixture. Follow this with a layer of crushed cookies, imitating the look of dirt.
-
Repeat the layers until you fill the cups, leaving a little space at the top for decorations. The contrast of colors—dark “dirt” against the creamy pudding—creates an eye-catching display.
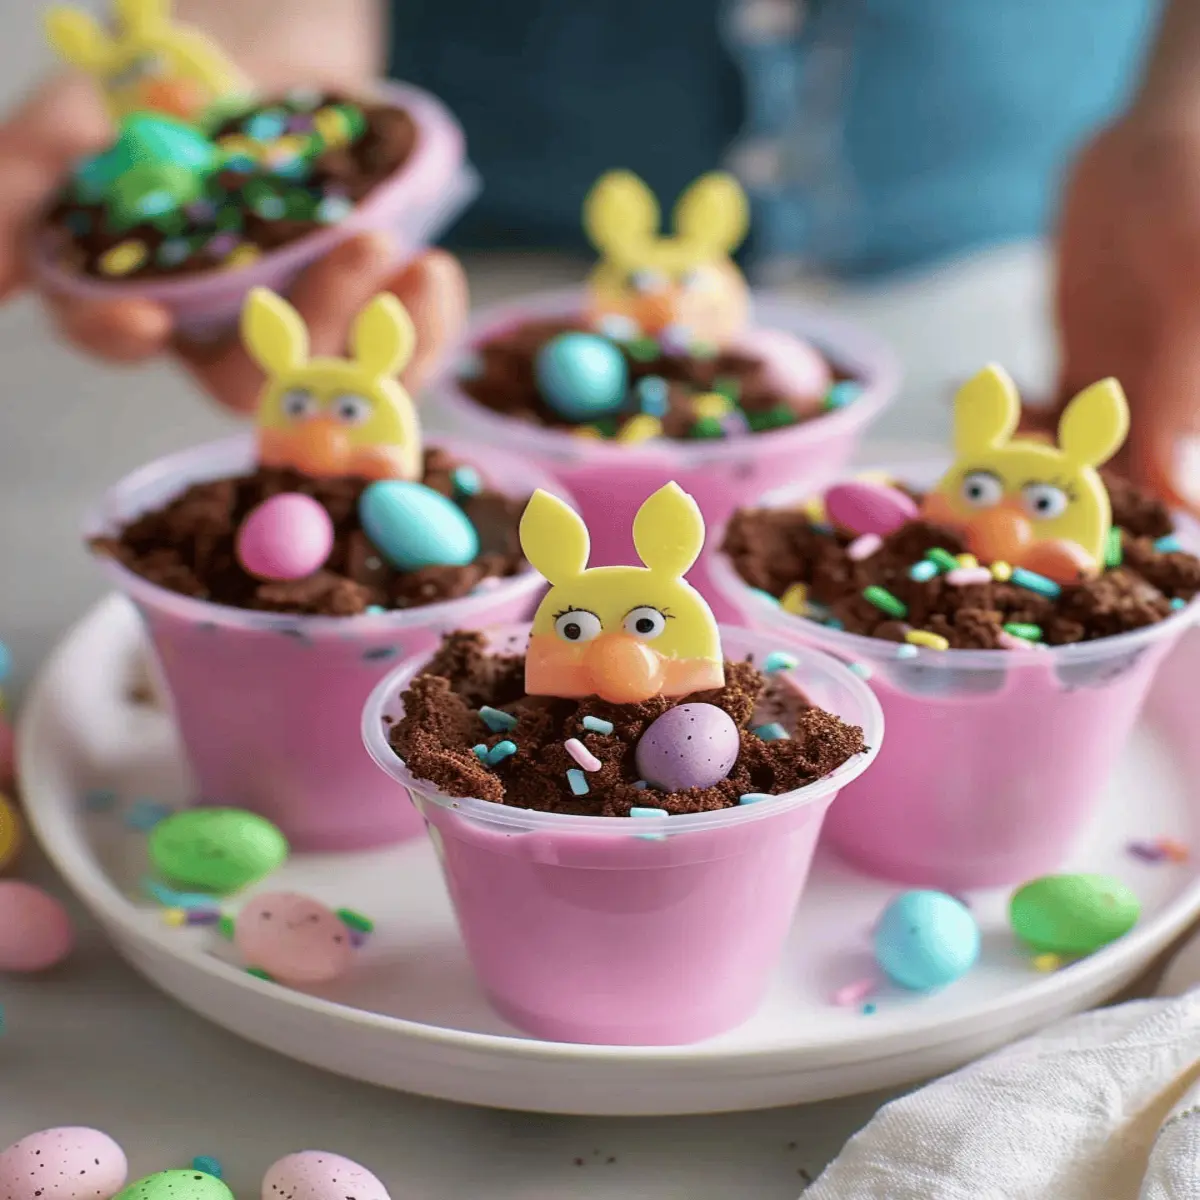
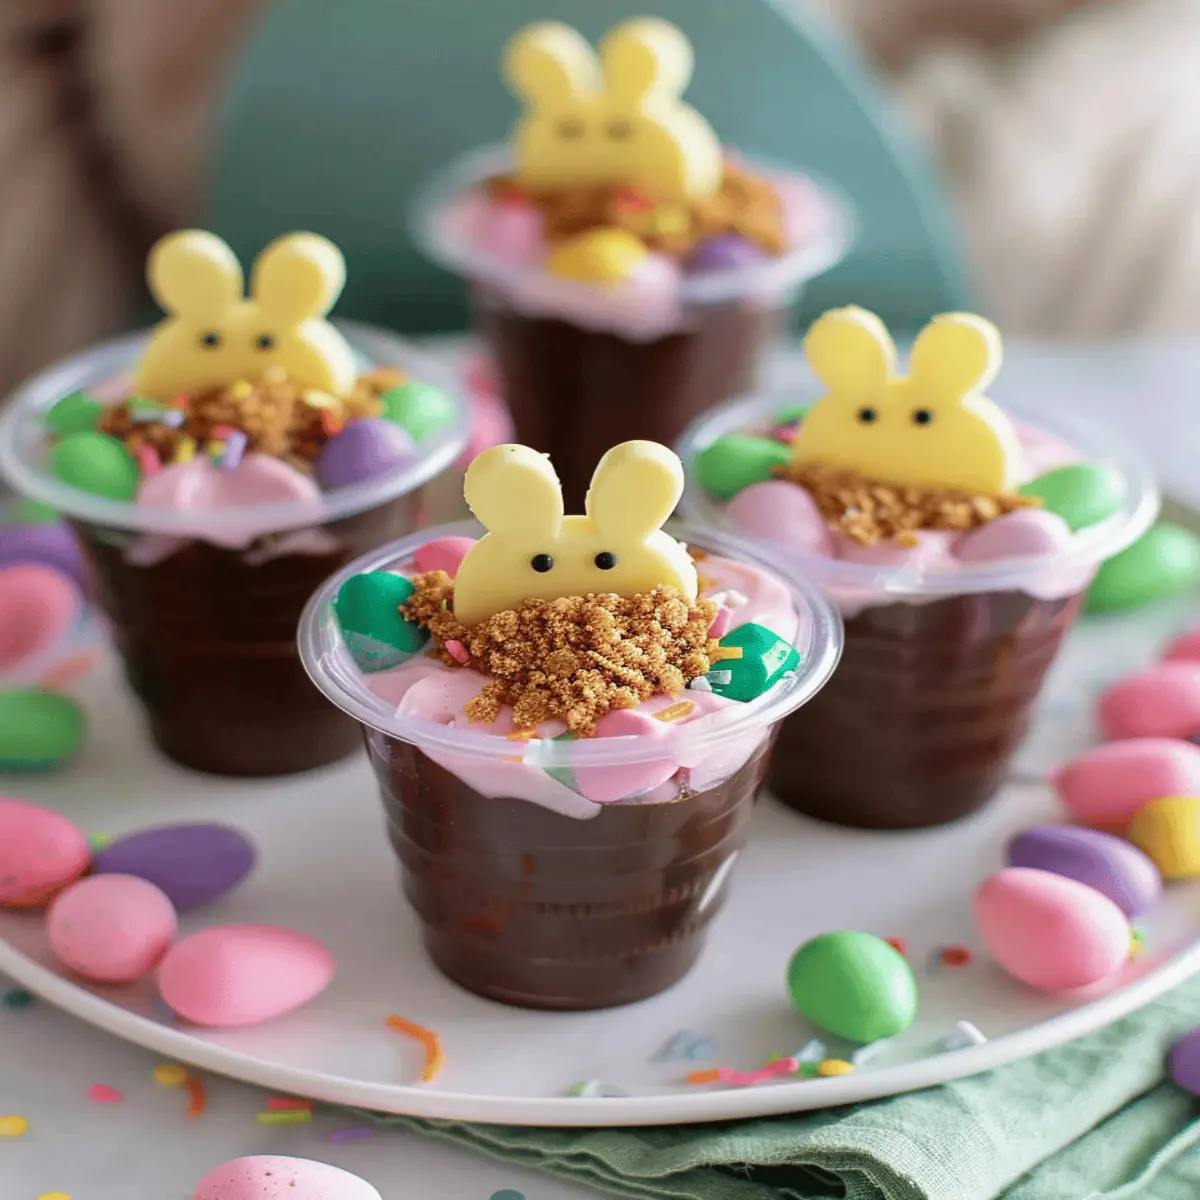
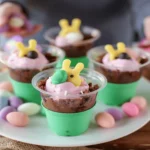
Add Your Decorations
Now for the finishing touches! Decorating your Easter Pudding Dirt Cups will really bring them to life.
- Place a gummy worm on top of the final cookie layer. You can let it drape over the side of the cup for a playful look.
- Consider adding some colorful sprinkles or edible grass to enhance the festive feel.
- If you’re feeling extra creative, why not include small edible flowers or bunny toppers for an authentic Easter vibe?
Once you’re done decorating, you’re ready to serve! These dessert cups make for great social media content if you’re keen on sharing your culinary masterpiece. For more festive recipes and ideas, check out resources from Taste of Home or Food Network!
Creating Easter Pudding Dirt Cups is not only a treat for the palate but also a wonderful way to engage in holiday spirit. They’re sure to become a favorite in your culinary repertoire!
Variations on Easter Pudding Dirt Cups
When it comes to Easter Pudding Dirt Cups, the base recipe is just the beginning. Why not try out a few variations to delight your family and friends?
Chocolate-themed Dirt Cups
For the chocolate lovers in your life, a chocolate-themed variant can take your Easter Pudding Dirt Cups to new heights. Here’s how to do it:
- Chocolate Pudding: Swap out the vanilla pudding for rich chocolate pudding. For extra decadence, whisk in a tablespoon of cocoa powder.
- Chocolate Cookies: Use crushed chocolate sandwich cookies instead of classic Oreos for a double chocolate delight.
- Extra Toppings: Top your dessert with chocolate shavings, mini chocolate eggs, or even a drizzle of chocolate syrup for that extra finesse.
As you create these, keep in mind that chocolate boosts serotonin, making everyone feel even happier!
Fruity Twist Dirt Cups
If you’re looking to lighten things up, why not add a fruity twist? These cups can be refreshing and vibrant—perfect for springtime celebrations.
- Fruit-flavored Pudding: Opt for strawberry or banana pudding as your base to add a burst of flavor.
- Fresh Fruit Layers: Incorporate fresh fruits like sliced bananas, strawberries, or blueberries into your cups. Layer them with the pudding for a fun and colorful display.
- Coconut Whipped Cream: Top with coconut whipped cream for a tropical feel, integrating another layer of texture and sweetness.
Not only do these variations make for stunning presentations, but they also pack in beneficial vitamins and antioxidants. Check out Healthline for more insights on the goodness of fruits.
Whether you choose the decadent chocolate version or the refreshing fruity twist, your Easter Pudding Dirt Cups are sure to impress and bring joy to your Easter table!
Cooking Tips and Notes for Easter Pudding Dirt Cups
How to Achieve the Perfect Layers
Creating those delightful layers in your Easter Pudding Dirt Cups is all about patience. Start by using clear cups to showcase those vibrant colors and textures. For the best results, spoon your pudding into the cup first, then gently layer crushed cookies, and finish with whipped cream. A small offset spatula or back of a spoon can help create smooth, even layers. Don’t hesitate to experiment with different cookie varieties for added flavor—like chocolate wafers or Oreos!
Storing Your Dirt Cups for Freshness
To keep your Easter Pudding Dirt Cups fresh, cover them tightly with plastic wrap or a lid if you’re using storage containers. Ideally, enjoy them within two days for the best taste and texture. If you want to make them ahead of time, consider prepping the components separately: keep the pudding, whipped cream, and cookie layers in the fridge. Just assemble them right before serving for that perfect crunch!
For additional storage tips, check out resources from The Kitchn and Martha Stewart.
Serving Suggestions for Easter Pudding Dirt Cups
Creative Serving Ideas for Gatherings
When it comes to Easter Pudding Dirt Cups, presentation is half the fun! Here are a few exciting ways to elevate your serving game:
- Individual Cups: Use clear plastic cups or small mason jars for a whimsical touch. Layer the pudding and crushed cookies, then top with gummy worms or edible flowers for a festive look.
- Family-Style Bowl: Serve a large bowl featuring layers of pudding and cookie crumbs, letting guests scoop their own servings. This encourages interaction and adds a casual vibe.
- Table Decor: Enhance your dish’s appeal by placing Easter-themed decorations around your pudding cups, like mini nests and eggs.
Alternative Ways to Enjoy Them
If you’re feeling adventurous, explore these unique variations of traditional Easter Pudding Dirt Cups:
- Flavor Swaps: Try chocolate, vanilla, or even matcha pudding for something different. (This pudding guide can help you choose!)
- Healthier Versions: Consider using Greek yogurt instead of pudding for a protein boost, or almond flour cookies for a gluten-free option.
With these delightful serving suggestions, your Easter Pudding Dirt Cups are sure to be a hit at any celebration. Happy Easter!
Time Breakdown for Easter Pudding Dirt Cups
When it comes to whipping up delightful Easter Pudding Dirt Cups, timing is everything! Here’s a simple guide to help you plan your sweet treat adventure.
Preparation Time
Getting started is a breeze! You’ll typically spend about 15-20 minutes gathering your ingredients and mixing everything together. Make sure you have everything from pudding mix to crushed cookies ready to go. Pro tip: assemble your ingredients ahead of time to save even more time!
Chilling Time
Once your cups are prepared, they need some time to chill. Allow them to sit in the refrigerator for about 2 hours. This step is not just about cooling; it helps the flavors meld together beautifully. As they chill, you can think about how to stylize your servings with fun toppings or Easter-themed decorations.
Total Time
In total, the entire process will take around 2 hours and 20 minutes, but trust me, the wait is worth every delicious bite! Perfect for brunch gatherings or festive family dinners, Easter Pudding Dirt Cups are sure to be a hit. For more sweet ideas, check out this recipe from Taste of Home for additional entertaining inspiration.
With this time breakdown, you’re perfectly equipped to make a delightful dessert that’s as fun to create as it is to enjoy!
Nutritional Facts for Easter Pudding Dirt Cups
When celebrating Easter, indulging in Easter Pudding Dirt Cups can be a delicious way to bring joy to your gathering. Let’s dive into the nutritional aspects to keep your enjoyment balanced!
Calories per serving
Each serving of these delightful cups generally contains around 250 calories. While not the lightest option on your dessert table, they offer a fun treat that fits well into a special celebration. Just remember, moderation is key!
Sugars and fats
When it comes to flavor, Easter Pudding Dirt Cups pack a sweet punch. Expect about 18 grams of sugar per serving, primarily from the pudding mix and candies you use. As for fats, there are roughly 7 grams of total fat, mainly from the whipped cream. Want to make this dessert a tad healthier? Consider using sugar-free pudding mix or low-fat whipped topping, both of which can be delicious alternatives. For more insights on reducing sugar or fat, check out resources from the American Heart Association.
These nutritional takeaways can help you enjoy Easter Pudding Dirt Cups without any guilt—after all, it’s about enjoying every moment!
FAQs about Easter Pudding Dirt Cups
Can I make these gluten-free?
Absolutely! Making Easter Pudding Dirt Cups gluten-free is quite easy. Simply swap out traditional cookies with gluten-free varieties. Brands like Glutino or Schär offer great options that still deliver that satisfying crunch. Additionally, always check the pudding mix and any toppings to ensure they’re free from gluten ingredients. This way, you can enjoy this delightful dessert without any worries.
How long do they last in the fridge?
Once prepared, Easter Pudding Dirt Cups can last about 3–5 days in the refrigerator, stored in an airtight container. However, for the best taste and texture, try to enjoy them within the first couple of days. After that, the moisture from the pudding can make the cookie layer a bit soggy. If you’re making these ahead of time, consider keeping the layers separate until you’re ready to serve.
What are some fun toppings to try?
The topping options for your Easter Pudding Dirt Cups are practically limitless! Here are some ideas to elevate your creation:
- Gummy worms: A classic choice that adds a playful touch.
- Chocolate shavings: For a more sophisticated twist, add some dark chocolate.
- Spring-themed sprinkles: Brighten it up with pastel-colored sprinkles.
- Fresh berries: Strawberries or blueberries can provide a refreshing contrast.
- Coconut flakes: Sprinkle some toasted coconut for added texture.
Feel free to experiment! Personalizing each cup not only enhances its visual appeal but also allows your unique personality to shine through.
For more fun topping ideas, check out articles on Food Network or Bon Appétit. Have fun with your Easter Pudding Dirt Cups, and let your creativity flow!
Conclusion on Easter Pudding Dirt Cups
Why make this dessert for Easter?
Easter Pudding Dirt Cups are more than just a fun dessert; they’re a delightful way to bring a touch of creativity and whimsy to your holiday celebrations. Imagine the joy on your friends’ and family’s faces as they dig through layers of chocolate pudding, crushed cookies, and colorful candy to discover hidden treats.
- Engagement: These cups encourage interaction, making them perfect for family gatherings or Easter brunch!
- Customization: With endless topping options, you can easily tailor them to suit different tastes or dietary needs.
- Nostalgia: Many have fond memories of similar treats from childhood, making it a great opportunity to create new memories.
By indulging in this playful dessert, you’re not just satisfying your sweet tooth—you’re elevating your Easter experience. So, why not add a dash of creativity and joy with Easter Pudding Dirt Cups this year? Check out more festive dessert ideas on Taste of Home or Food Network for additional inspiration!
Easter Pudding Dirt Cups: Irresistibly Fun & Decadent Treats
These Easter Pudding Dirt Cups are the perfect blend of fun and indulgence, making them a must-have treat this spring!
- Prep Time: 20 minutes
- Cook Time: 0 minutes
- Total Time: 30 minutes
- Yield: 4 servings 1x
- Category: Dessert
- Method: No-bake
- Cuisine: American
- Diet: Vegetarian
Ingredients
- 2 cups chocolate pudding
- 1 cup whipped cream
- 1 package Oreo cookies, crushed
- 1 cup gummy worms
- 2 tablespoons chocolate sprinkles
Instructions
- Prepare the chocolate pudding according to package instructions.
- In a bowl, gently fold the whipped cream into the pudding until fully combined.
- Layer crushed Oreo cookies at the bottom of serving cups.
- Add a layer of the chocolate pudding mixture on top of the cookies.
- Continue layering with more crushed cookies and pudding.
- Top with gummy worms and chocolate sprinkles for decoration.
- Chill in the refrigerator for at least 30 minutes before serving.
Notes
- For a twist, consider using vanilla pudding or adding fresh fruit.
- Make these a day in advance for best results.
Nutrition
- Serving Size: 1 cup
- Calories: 250
- Sugar: 15g
- Sodium: 150mg
- Fat: 10g
- Saturated Fat: 5g
- Unsaturated Fat: 3g
- Trans Fat: 0g
- Carbohydrates: 35g
- Fiber: 2g
- Protein: 3g
- Cholesterol: 25mg
Keywords: Easter, pudding, dirt cups, dessert, fun treats