Introduction to Creamy Dairy-Free Ice Cream
Why I Love Making Ice Cream at Home
There’s something truly magical about making ice cream at home. For one, it’s an opportunity to unleash your creativity. When you prepare your own creamy dairy-free ice cream, you can play with flavors, sweeteners, and even mix-ins to cater to your taste buds. Whether it’s a rich chocolate swirl or a fruity berry burst, the options are endless.
Plus, making ice cream allows me to control the ingredients. I can opt for high-quality plant-based milks, like almond or coconut, ensuring that every scoop is not only indulgent but also free from artificial additives. And let’s be honest—nothing beats the satisfaction of pulling out a pint from the freezer that you’ve created with your own hands. It’s a little piece of joy that you can customize to your heart’s content.
The Growing Popularity of Dairy-Free Alternatives
In recent years, the popularity of dairy-free alternatives has skyrocketed, and for good reason. According to a report by Statista, the global dairy alternatives market is projected to reach $25 billion by 2027. Millions of people are opting for dairy-free diets, whether due to lactose intolerance, allergies, or simply personal choice. The rise of plant-based diets has also significantly influenced this trend.
Even if you’re not completely giving up dairy, exploring dairy-free options can be a delightful culinary adventure. Imagine experimenting with flavors like matcha, lavender, or even avocado in your creamy delights! This growing interest in alternative diets invites us to rethink how we approach food and opens up a world of delicious possibilities.
Making your own creamy dairy-free ice cream allows you to join this trend, whether you’re lactose-intolerant or not. It’s an opportunity to indulge guilt-free while treating your palette to something exciting. Interested in exploring more? Check out this article on the benefits of a dairy-free diet for deeper insights.
So, let’s grab our ice cream makers and get ready to beat the heat with beautiful, homemade creamy dairy-free ice cream!
Ingredients for Creamy Dairy-Free Ice Cream
Creating a delicious creamy dairy-free ice cream at home is easier than you might think! Let’s break down the essentials to ensure you get that perfect scoop every time.
Essential Base Ingredients
To achieve that indulgent creaminess, focus on these key components:
- Coconut milk: This is a fantastic base, rich in healthy fats that offer a creamy texture.
- Cashew cream: Another excellent alternative that adds a silky smoothness to your ice cream.
- Sweetener: Maple syrup or agave nectar works beautifully to enhance the natural flavors without dairy.
For more ideas on dairy-free bases, check out resources from The Kitchn.
Flavor Enhancers and Mix-Ins
Now, let’s get creative! Consider adding:
- Vanilla extract: A touch of pure vanilla can elevate your dessert.
- Fruit puree or chocolate: For a burst of flavor, try blending in your favorite fruits or dairy-free chocolate.
- Nuts and seeds: These add crunch and texture, making each bite more enjoyable.
Special Equipment Needed
While you don’t need a fancy setup, a few tools will help:
- Ice cream maker: This is ideal for achieving that churned, creamy consistency.
- Blender: A high-speed blender helps to create a smooth base, especially if you’re using nuts.
By gathering these ingredients and tools, you’ll be well on your way to enjoying a delightful, creamy dairy-free ice cream that everyone will love!
Step-by-step Preparation of Creamy Dairy-Free Ice Cream
Creating a delightful creamy dairy-free ice cream at home is not only a rewarding experience, but it also allows you to control the ingredients. With just a few simple steps, you can whip up a luscious treat that’s perfect for warm summer days or cozy evenings on the couch. Let’s get started!
Preparing your base
The foundation of any great ice cream is a solid base, and for this creamy dairy-free ice cream, you have several options. Using non-dairy milk like coconut milk, almond milk, or even oat milk can give your ice cream a rich texture.
- Choose Your Milk: If you’re after a creamy flavor, coconut milk is often the best choice. Use full-fat coconut milk for an extra indulgent treat!
- Sweetener Options: For sweetness, you can use natural sweeteners like maple syrup or agave nectar. A good ratio to start with is about ½ cup of sweetener for every 4 cups of milk used.
- Flavor Enhancements: Vanilla extract can elevate your ice cream significantly. Consider adding a pinch of salt to balance the sweetness.
Combine these ingredients in a medium saucepan over low heat, stirring occasionally until your sweetener dissolves. This only takes a few minutes and gets the base ready for the next step.
Blending for the perfect texture
Once your base is prepared, it’s time to blend for that perfectly smooth and creamy texture.
- Use a Vitamix or High-Powered Blender: Transfer your warm mixture into a high-powered blender, and blend on high speed for about 30 seconds until fully combined and silky. This helps to incorporate air, making the ice cream light and fluffy.
- Consider Additional Ingredients: If you want to add richness, consider tossing in a few tablespoons of nut butter or coconut cream. This not only enhances the flavor but also contributes to the creaminess.
Chilling the mixture
Chilling the mixture is crucial to achieving that smooth texture. After blending:
- Let it Cool: Allow the mixture to cool at room temperature for about 30 minutes.
- Refrigerate: After it cools down, transfer the mix to an airtight container and refrigerate for at least 2-4 hours, or even overnight if you have the time. This step is key because it ensures your ice cream will churn more effectively.
Churning your ice cream
Now comes the fun part—churning! If you have an ice cream maker, this will be a breeze.
- Follow Manufacturer’s Instructions: Pour the chilled mixture into your ice cream maker and churn according to the manufacturer’s instructions, usually about 20-25 minutes, until it reaches a soft-serve consistency.
- Manual Method: No ice cream maker? No problem! Pour the mixture into a freezer-safe bowl. Stir it every 30 minutes for the first 3 hours to break up ice crystals and promote creaminess.
Freezing for that creamy consistency
Once churned, it’s crucial to freeze the ice cream correctly to achieve that desirable texture.
- Transfer to a Container: Move your churned ice cream into a lidded, airtight container.
- Freeze Time: Let it freeze for at least 4 hours to firm up. If you plan to make a big batch, try breaking it into smaller containers; this helps it to freeze faster and remain fresher when you grab a scoop!
When you pull it out of the freezer, let it sit for a few minutes before scooping so it’s easier to serve.
Making your own creamy dairy-free ice cream at home is not only a delicious endeavor but a creative one too! Feel free to experiment with different flavorings, mix-ins like chocolate chips, or even fresh fruits to customize your treat. Happy churning!

Variations of Creamy Dairy-Free Ice Cream
When it comes to creamy dairy-free ice cream, the possibilities are as endless as your imagination. Here are some delightful variations that can elevate your dessert game while keeping it plant-based.
Chocolate Almond Bliss
Indulge in layers of rich chocolate flavor combined with the nutty essence of almonds. Start with a base of coconut or almond milk, then blend in unsweetened cocoa powder and a splash of almond extract. For added texture, fold in chopped almonds or almond butter. This version is perfect for satisfying a chocolate craving with a hint of sophistication.
Tropical Coconut Mango
Transport yourself to a sun-kissed beach with this vibrant treat. Using a base of creamy coconut milk, add ripe mango puree and a dash of lime juice for a refreshing zing. The exquisite combination of coconut and mango will make you feel like you’re on vacation, even if you’re just in your kitchen. Check out Tropical Fruit Nutrition for details on their health benefits.
Rich Vanilla Bean
You can never go wrong with the classic taste of vanilla. Using vanilla bean paste or scraping fresh vanilla beans into your base will give you an incredibly aromatic and creamy dairy-free ice cream. Sweeten it with maple syrup or coconut sugar for a hint of caramel flavor. This is a versatile option that serves as the perfect foundation for mix-ins like chocolate chips or berries!
Seasonal Fruit Flavors
Why not take advantage of seasonal fruits? When strawberries are at their peak, blend them right into a soft-serve-style vanilla base. In the fall, roasted pumpkin or apple-cinnamon can provide a delightful twist. Fresh fruits bring not only flavor but also nutrients — just think of the vibrant colors and textures! You might even want to check Seasonal Produce Guides for inspiration.
With these variations, your creamy dairy-free ice cream journey will be nothing short of delicious! Enjoy experimenting while crafting your own unique flavors. What will you create next?
Cooking Tips and Notes for Creamy Dairy-Free Ice Cream
Perfecting the Texture
To achieve that rich, velvety texture in your creamy dairy-free ice cream, be sure to blend your base ingredients thoroughly. Using a high-speed blender can help break down any remaining solids, ensuring a smooth texture. Consider adding a tablespoon of coconut oil or agave syrup; these can enhance creaminess. If you’re craving a hint of chocolate, don’t hesitate to incorporate cacao powder or dark dairy-free chocolate chips for an extra indulgent touch.
Troubleshooting Common Ice Cream Issues
If your ice cream doesn’t turn out quite right, fear not! Here are some common issues and solutions:
- Ice Crystals Formation: Try to store your ice cream in an airtight container. A good tip is to layer a sheet of plastic wrap directly on the surface before sealing the lid.
- Too Soft: Check your freezing time—adding a little more thickening agent, like cornstarch or arrowroot powder, can help.
- Flavor Too Strong: If a flavor is overwhelming, mix in some unsweetened vanilla extract to balance it out.
For more information on the science behind ice cream making, check out this Ice Cream Science article.
Storing Your Homemade Ice Cream
Homemade creamy dairy-free ice cream can be stored in the freezer for about two weeks. To keep it fresh, always use an airtight container, and for best results, freeze it at the coldest setting! Just remember, it’s best enjoyed fresh, so whip up small batches to ensure you savor every creamy bite. Restricting exposure to air helps minimize freezer burn, which can ruin that delicious creaminess you’ve worked hard to achieve.
Serving Suggestions for Creamy Dairy-Free Ice Cream
Creating the perfect moment with your creamy dairy-free ice cream involves more than just the scoop! Here are some delightful serving suggestions that will make your dessert unforgettable.
Creative Bowl Presentations
Elevate your creaminess by choosing unique serving dishes. Try using:
- Coconut shells for a tropical touch
- Mason jars for a rustic vibe
- Colorful dessert cups that enhance visual appeal
Placing colorful fruits or edible flowers around the ice cream can also boost presentation.
Pairing with Homemade Desserts
Why not complement your creamy dairy-free ice cream with homemade treats? Pair it with:
- Brownies or blondies for a chewy texture
- Warm apple pie for a comforting touch
- Fresh fruit crumbles that contrast the chill
These combinations not only enhance flavors but also add a personal touch to your meal.
Toppings That Elevate the Experience
Toppings can transform your ice cream into something spectacular! Consider:
- Crushed nuts like pistachios or almonds for crunch
- A drizzle of maple syrup or chocolate sauce for sweetness
- Fresh herbs like mint for unexpected freshness
Don’t forget to also check out some topping inspiration from sites like Serious Eats or Spruce Eats for further creativity! By making these thoughtful choices, you’ll create a decadent dessert that will have everyone asking for seconds.
Time Breakdown for Creamy Dairy-Free Ice Cream
Creating your own creamy dairy-free ice cream is a rewarding endeavor that allows you to indulge without guilt. Here’s a simple breakdown to help you plan your sweet creation.
Preparation time
First up, gather your ingredients and tools. This should take about 15-20 minutes. Make sure your blender or food processor is ready to whip up a smooth base. If you’re experimenting with flavors like vanilla or chocolate, having everything prepped will streamline the process.
Chilling time
After preparing your mixture, allow it to chill in the fridge for at least 2 hours. This step isn’t just a formality; chilling enhances flavors and texture, making your ice cream even more delightful. If you’re short on time, a minimum of an hour will do, but patience pays off!
Churning and freezing time
Once chilled, it’s time for the fun part! Churn your creamy dairy-free ice cream mixture in an ice cream maker for about 20-30 minutes. After churning, transfer it to an airtight container and freeze for an additional 4 hours to achieve that perfect scoopable consistency.
Total time for homemade delight
In total, expect around 6 hours and 50 minutes from start to finish—most of which is chilling or freezing time. But don’t worry, the hands-on time is minimal, making it easy to fit this delicious project into your day. With just a bit of planning, you’ll be savoring your homemade creamy dairy-free ice cream in no time!
Nutritional Facts for Creamy Dairy-Free Ice Cream
Calories per Serving
When indulging in creamy dairy-free ice cream, you can expect around 150-200 calories per serving, depending on the ingredients used. This makes it a lighter alternative to traditional ice cream, allowing you to satisfy your sweet cravings without derailing your healthy eating plans.
Sugar Content and Alternatives
Most creamy dairy-free ice cream varieties contain about 15-25 grams of sugar per serving. If you’re watching your sugar intake, consider using alternatives like agave syrup, maple syrup, or stevia. These options can keep your dessert sweeter without excessive calories.
For more details on healthy sweeteners, check out resources from Healthline.
Health Benefits of Dairy-Free Choices
Choosing dairy-free ice cream not only caters to lactose intolerance but also can benefit your overall health. Many plant-based options are lower in saturated fat and can include beneficial nutrients from ingredients like coconut milk or almond milk. Additionally, these alternatives often provide dietary fiber and antioxidants, supporting a well-rounded diet.
For expert insights, you can read more about the health benefits of plant-based diets on Vegetarian Times.
By opting for creamy dairy-free ice cream, you’re not just enjoying a delicious treat but also making a thoughtful choice for your health!
FAQs about Creamy Dairy-Free Ice Cream
Can I make this ice cream without an ice cream maker?
Absolutely! Making creamy dairy-free ice cream without a machine is quite simple. Just pour your blended mixture into a freezer-safe container and freeze it. Every 30-60 minutes, stir it vigorously with a fork for the first few hours. This aerates the mixture and helps prevent ice crystals from forming, creating a smoother texture.
What can I use instead of coconut milk?
Coconut milk is a fantastic base for creamy dairy-free ice cream, but if you’re not a fan or have allergies, alternatives abound. Consider using almond milk for a lighter option, or cashew cream for an even creamier consistency. Oat milk and soy milk can also work well, but make sure they’re unsweetened to maintain balance in flavors.
How long does homemade ice cream last in the freezer?
Your creamy dairy-free ice cream can stay fresh in the freezer for about 1 to 2 weeks. Keep it in an airtight container to minimize exposure to air, which can lead to freezer burn. For best results, try to consume it within the first week for optimal flavor and texture.
Is dairy-free ice cream healthier than traditional ice cream?
Dairy-free ice cream can be a healthier choice, depending on the ingredients. Many are lower in calories and fat, especially if you’re using plant-based bases like almond or oat milk. However, some brands add sugars and preservatives, so always check labels. If you’re curious about specific nutritional comparisons, consider checking resources like the USDA FoodData Central for more insights.
These FAQs should help you tackle your creamy dairy-free ice cream journey with confidence!
Conclusion on Creamy Dairy-Free Ice Cream
Making creamy dairy-free ice cream at home is not just a treat for yourself but a delightful experience to share with friends and family. It’s surprisingly simple, allowing you to experiment with flavors that excite your taste buds. Why not whip up a batch this weekend?
Sharing homemade treats fosters joy and connection. As you scoop your delicious creations into bowls, you’ll witness smiles of satisfaction and gratitude. Who doesn’t love indulging in a sweet treat made with love? If you want more inspiration, check out This Dairy-Free Ice Cream Guide for additional recipes that will elevate your ice cream game even further! Remember, culinary adventures are always sweeter when shared.
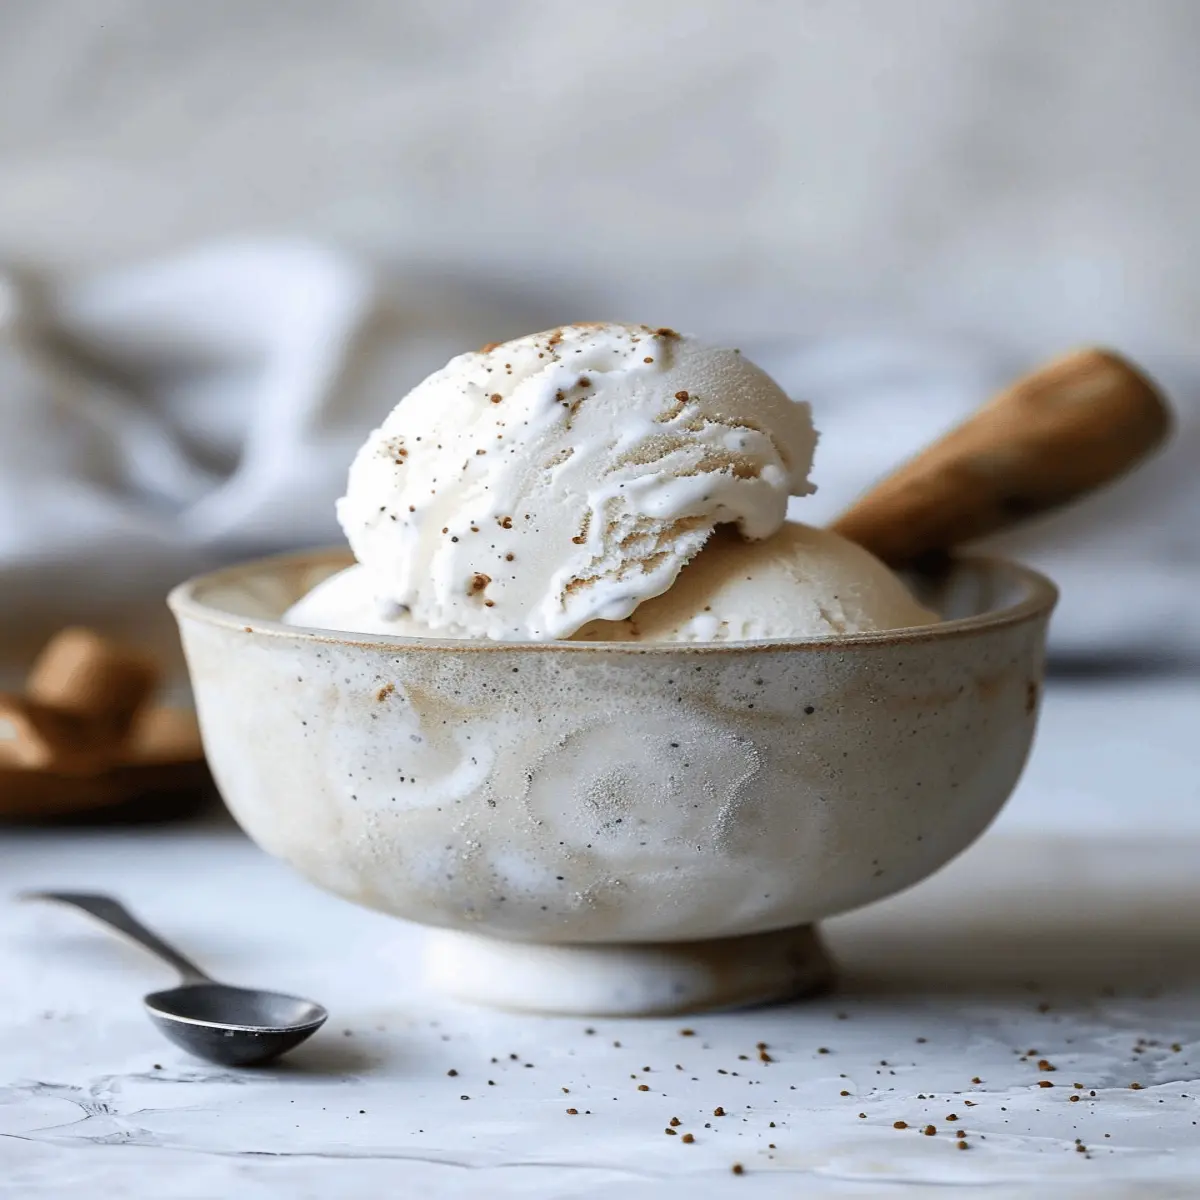
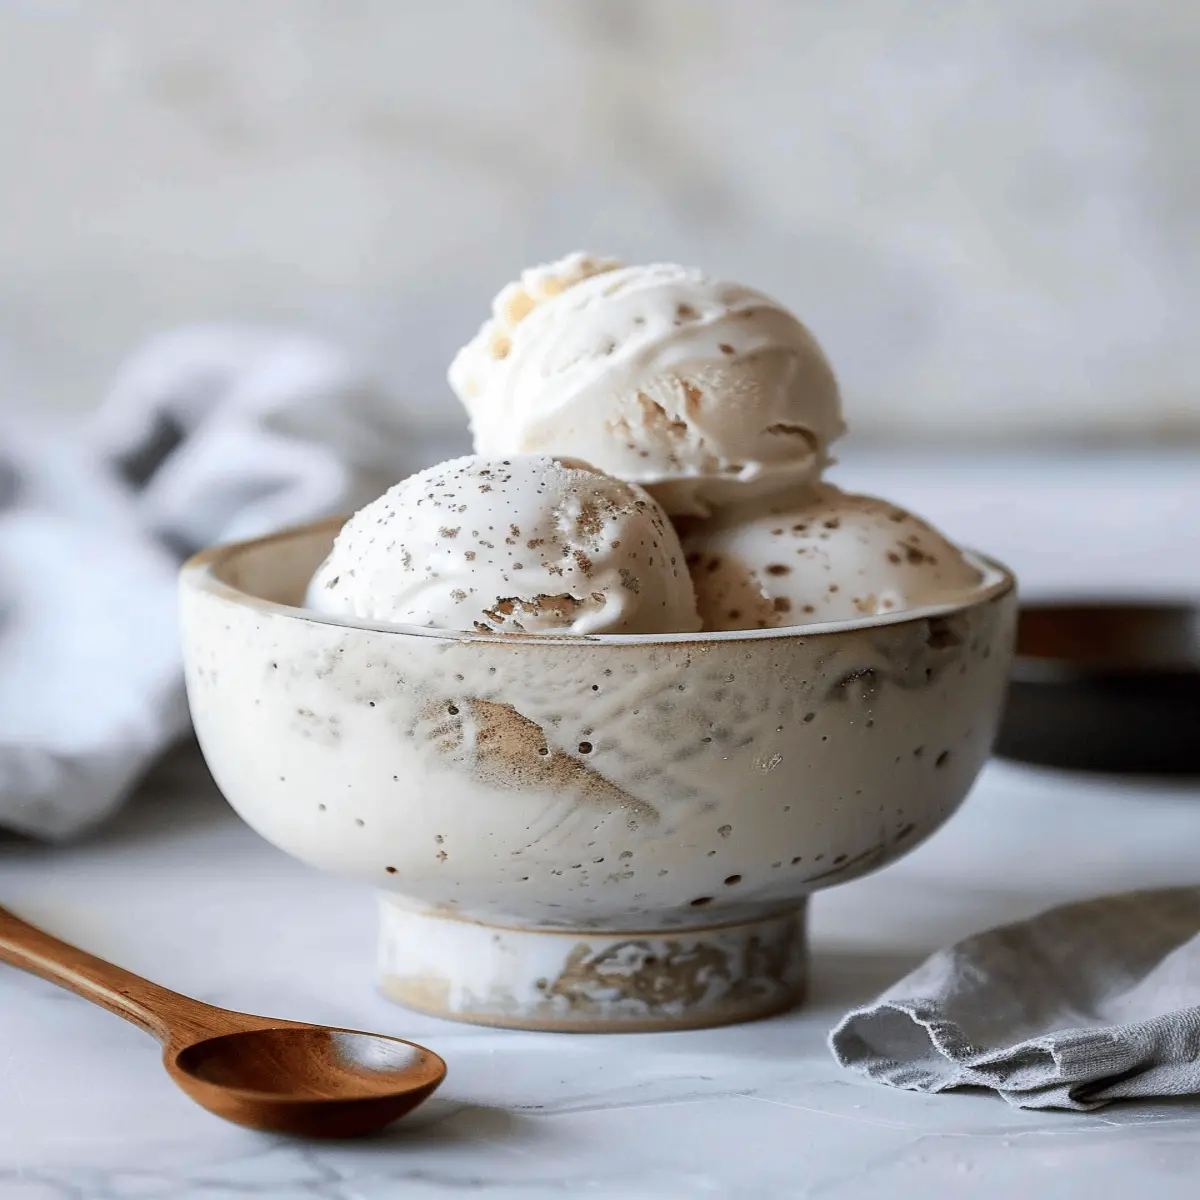
Creamy Dairy-Free Ice Cream: Indulgent Treats You’ll Love

Enjoy a rich and creamy dairy-free ice cream made with wholesome ingredients, perfect for satisfying your sweet cravings.
- Prep Time: 10 minutes
- Cook Time: 0 minutes
- Total Time: 4 hours 10 minutes
- Yield: 4 servings 1x
- Category: Dessert
- Method: Churning
- Cuisine: American
- Diet: Vegan
Ingredients
- 2 cups coconut milk
- 1 cup almond milk
- 3/4 cup maple syrup
- 1 tablespoon vanilla extract
- 1/4 cup cocoa powder
Instructions
- In a mixing bowl, combine coconut milk, almond milk, maple syrup, and vanilla extract.
- Whisk until well combined and smooth.
- Add cocoa powder, and mix until fully incorporated.
- Pour the mixture into an ice cream maker and churn according to the manufacturer’s instructions.
- Once churned, transfer to a container and freeze for at least 4 hours before serving.
Notes
- For a different flavor, try adding other extracts like almond or mint.
- Make sure to chill the mixture in the refrigerator for a few hours to enhance the churning process.
Nutrition
- Serving Size: 1/2 cup
- Calories: 150
- Sugar: 10g
- Sodium: 5mg
- Fat: 8g
- Saturated Fat: 7g
- Unsaturated Fat: 1g
- Trans Fat: 0g
- Carbohydrates: 20g
- Fiber: 1g
- Protein: 2g
- Cholesterol: 0mg
Keywords: Creamy Dairy-Free Ice Cream, vegan ice cream, dessert recipes