Introduction to Bisquick Sausage Balls
Why Bisquick Sausage Balls are a Game Changer for Busy Professionals
Let’s face it: juggling a career and social life can often feel like an Olympic sport. When it comes to snacks, we want something quick, easy, and delicious. Enter Bisquick Sausage Balls. These little bites not only satisfy your cravings but can also be whipped up in no time. Just with a handful of simple ingredients and minimal effort, you’ll have tasty treats that are both satisfying and hearty. Not to mention, they’re a great source of protein, perfect for refueling during a busy workday.
A Personal Story about the First Time I Made Them
I still remember the first time I made Bisquick Sausage Balls. I was hosting a last-minute gathering and was stressed about what to serve. I had some ground beef and a box of Bisquick in my pantry, so I decided to give it a shot. The smell wafting through my kitchen was absolutely divine! By the time my friends arrived, they couldn’t resist the urge to dive into these warm, cheesy morsels. Not only did they disappear within minutes, but everyone asked for the recipe. It was a total game changer for my social life—and it continues to be a go-to for effortless entertaining.
The Perfect Snack for Gatherings or a Busy Workweek
Bisquick Sausage Balls are incredibly versatile. Whether you’re hosting a weekend brunch or in need of a quick bite to keep you fueled during your workweek, these bite-sized snacks fit the bill. They’re fully customizable, allowing you to experiment with different cheeses or even add in some spices for a kick. Plus, they can be made ahead of time and frozen. Just pop them in the oven when you’re ready, and voilà—snack nirvana awaits!
For more insights on making snacks that work for you, check out this helpful resource. With Bisquick Sausage Balls in your repertoire, you can wave goodbye to midweek snack stress and hello to your new favorite kitchen hack.

Ingredients for Bisquick Sausage Balls
When it comes to making the perfect Bisquick Sausage Balls, the right ingredients can make all the difference. Let’s dive into what you’ll need for a burst of flavor and texture that will have everyone reaching for seconds!
Key ingredients you’ll need for the best flavor
To create mouthwatering Bisquick Sausage Balls, gather these essentials:
- Beef sausage: Choose a flavorful variety, whether spicy or mild.
- Bisquick mix: This versatile mix creates that classic, fluffy texture.
- Shredded cheese: Cheddar or a blend works wonders for richness.
- Milk: This helps bind everything together for a moist bite.
For more tips on ingredient quality, you can check out this guide.
The importance of using room temperature ingredients
Using room temperature ingredients is crucial. It allows for better mixing, ensuring even distribution of flavors in your Bisquick Sausage Balls. This way, you’ll have a consistent texture throughout the mixture, leading to evenly cooked, delightful morsels.
Optional add-ins for enhanced flavor
Want to take your Bisquick Sausage Balls to the next level? Consider adding:
- Chopped green onions: For a fresh, vibrant crunch.
- Diced jalapeños: For a spicy kick.
- Herbs and spices: Think garlic powder or parsley for extra depth.
These small tweaks can elevate your dish, making each bite a surprise!
Now you’re all set to whip up some amazing Bisquick Sausage Balls. Enjoy the cooking!
Preparing Bisquick Sausage Balls
Making Bisquick Sausage Balls is a scrumptious venture that combines simplicity with flavor. They’re perfect for parties, game days, or simply as a snack! Follow along as we guide you through each step in making these delicious treats, ensuring you whip up a batch you’ll be proud to serve.
Preheat your oven
Before diving into the mixing, it’s essential to preheat your oven to 350°F (175°C). A properly heated oven ensures that your Bisquick Sausage Balls rise and cook evenly, giving them that delightful golden-brown finish. This step also gives you a head start, allowing you to move smoothly through the rest of the preparation without a delay.
Combine the sausage and cheese
The heart of Bisquick Sausage Balls lies in the meat and cheese. Start by choosing your favorite ground beef sausage; you can opt for spicy or mild depending on your preference. In a large mixing bowl, combine:
- 1 pound of beef sausage
- 2 cups of shredded cheese (cheddar works best)
Using your hands or a sturdy spatula, mix these ingredients until they’re well combined. The goal here is to create a uniform mixture where the flavors meld together beautifully. You might even consider trying different cheese types, like mozzarella or pepper jack, for a unique twist. If you want to learn more about cheese options for recipes, check out articles from The Cheesemaking Supply Company.
Add the Bisquick mix
Once you have a solid sausage and cheese mixture, it’s time to blend in the Bisquick mix. Sprinkle in:
- 2 cups of Bisquick mix
Using your hands, gently integrate the Bisquick with the sausage and cheese until it forms a dough-like consistency. This step is crucial for the binding properties of the Bisquick, helping the ingredients stick together while baking. It’s like crafting a savory dough that’ll ultimately give your balls that delightful structure.
Incorporate milk as needed
Depending on the moisture content of your sausage, you may need to add some milk to the mixture. Start with:
- ¼ cup of milk
Gradually mix it in, ensuring you don’t overdo it; you want a stiff yet workable dough. If it feels too dry, add a touch more milk—one tablespoon at a time—until you reach the desired consistency. Proper moisture helps create soft and tender Bisquick Sausage Balls that melt in your mouth.
Shape the sausage balls
Now comes the fun part—shaping! With clean hands, scoop out portions of the mixture and roll them into balls about the size of a golf ball. Aim for uniform sizes to ensure even cooking. If you find the mixture is sticking to your hands, lightly oil them or use a bit of cooking spray to make the process smoother.
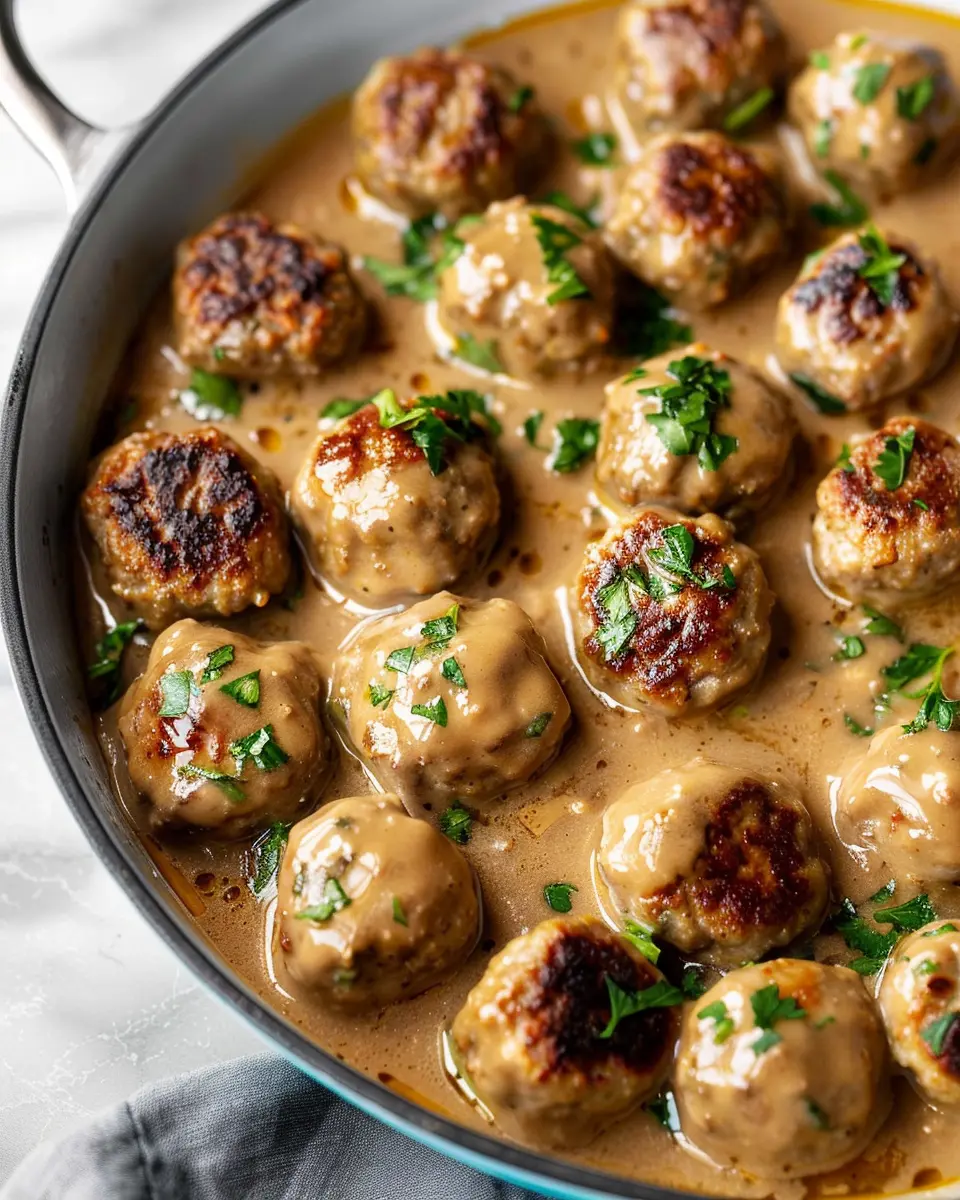
Arrange and bake
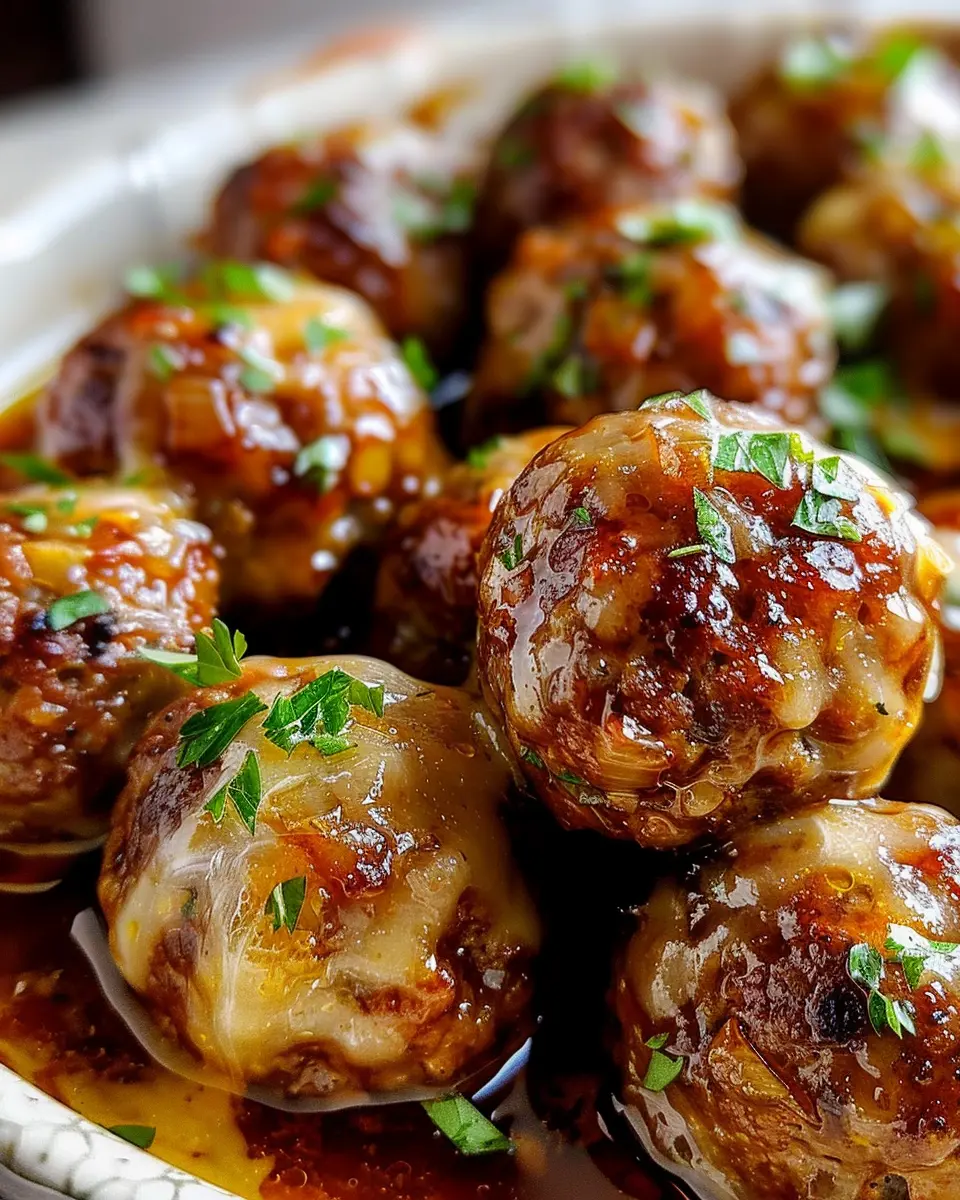
Once you’ve shaped all your Bisquick Sausage Balls, place them on an ungreased baking sheet, leaving a little space between each ball for even baking. Pop the tray into your preheated oven and let them bake for about 20-25 minutes, or until they turn a beautiful golden brown. As they bake, your kitchen will be filled with an irresistible aroma that will have everyone wandering in to check on the progress!
Keep an eye on them; the last thing you want is to overbake. When they’re perfectly golden and slightly firm to the touch, you know they’re done! Serve them warm with a dipping sauce like marinara or ranch for an extra flavor kick.
By following these steps, you’ll create delicious Bisquick Sausage Balls that are sure to impress your friends and family. Enjoy the cooking process and the delightful taste of your homemade snacks!

Variations on Bisquick Sausage Balls
Spicy Sausage Balls for the Adventurous Foodie
If you’re looking to turn up the heat, spicy Bisquick sausage balls are the perfect twist. Just swap in your favorite spicy sausage—think jalapeño or chorizo—for that extra kick! You can also add diced jalapeños or a touch of cayenne pepper to the mix for even more flavor. Serve these tantalizing bites with a cooling dipping sauce like sour cream or tzatziki to balance out the heat. Trust me, your taste buds will thank you!
Cheese and Herb Variations for a Gourmet Touch
Elevate your Bisquick sausage balls with gourmet elegance by incorporating different cheeses and herbs. Try adding sharp cheddar for a rich flavor, or experiment with feta and spinach for a unique twist. Fresh herbs like parsley, thyme, or rosemary can really bring your sausage balls to life. Don’t shy away from mixing in a tablespoon of your favorite mustard or even a dash of honey for an unexpected yet delightful flavor profile. For culinary inspiration, check out Food Network for herb recommendations that complement your favorite cheeses!
Vegetarian-Friendly Options Using Plant-Based Sausage
For those who prefer a meatless option, you’re in luck! Replace traditional sausage with a quality plant-based sausage. There are many delicious varieties available now that mimic the savory flavor we love—look for brands that resonate with your palate. Mix in your favorite vegetables, such as finely chopped bell peppers or spinach, to add both color and texture. And don’t forget to adjust your seasoning to ensure your Bisquick sausage balls shine just as brightly as their meaty counterparts. For more tips on plant-based cooking, check out EatingWell.
Adventurous? Gourmet? Vegetarian? No matter your preference, the beauty of Bisquick sausage balls lies in their versatility. Get creative and make them your own!
Cooking tips and notes for Bisquick Sausage Balls
Importance of grating your own cheese
When making Bisquick Sausage Balls, grating your own cheese can make a significant difference in both texture and flavor. Pre-packaged shredded cheese often contains anti-caking agents, which can prevent it from melting smoothly. Freshly grated cheese not only melts better but also offers a richer taste, enhancing the overall flavor of your sausage balls. Plus, it’s a great way to sneak in more cheese if you’re a fan!
How to check the internal temperature
To ensure your Bisquick Sausage Balls are cooked perfectly, use a meat thermometer to check the internal temperature. Aim for 160°F (71°C) to guarantee that the sausage is safe to eat. This small step makes a big difference in achieving juicy, flavorful bites every time!
Tips for making ahead or freezing
Want to meal prep? You can easily make your Bisquick Sausage Balls ahead of time. Simply roll them into balls, place them on a baking sheet, and freeze until solid. Once frozen, transfer them to a zip-top bag for convenient storage. They can last up to three months! When you’re ready to enjoy them, simply bake from frozen, adjusting the cooking time as needed. It’s a hassle-free way to have delicious snacks on hand anytime.
For more tips on storing and preparing snacks, check out sources like the USDA for safe food practices or Serious Eats for expert cooking advice.

Serving Suggestions for Bisquick Sausage Balls
When you’re whipping up a batch of Bisquick Sausage Balls, the fun doesn’t stop at just baking. Here are some delightful ways to serve these tasty bites!
Perfect Pairings for Dipping Sauces
Dipping sauces can elevate your Bisquick Sausage Balls to new heights. Here are a few suggestions:
- Honey Mustard: This tangy-sweet mix is a crowd-pleaser and works wonders with savory flavors.
- Ranch Dressing: Creamy and cool, ranch adds a nice contrast and is sure to satisfy your guests.
- Spicy Sriracha Mayo: For those who love a kick, blend mayonnaise with Sriracha for a creamy heat.
Creative Serving Ideas for Parties
Looking to impress your guests? Try these fun serving ideas:
- Skewers: Serve your Bisquick Sausage Balls on skewers for easy eating. Add cherry tomatoes or bell pepper pieces for color.
- Mini Sliders: Place a couple of sausage balls in slider buns and top with a drizzle of barbecue sauce for an interactive appetizer.
- Charcuterie Board: Incorporate your sausage balls into a charcuterie spread with cheeses, fruits, and nuts for an aesthetically pleasing display.
How to Enjoy Them as a Meal
Bisquick Sausage Balls can absolutely be the star of your meal. Here’s how:
- Breakfast: Pair them with scrambled eggs and a side of fruit for a hearty start to your day.
- Lunch Wrap: Put a few sausage balls in a tortilla with some lettuce, avocado, and a spread of your choice for a quick, satisfying lunch.
Incorporating these suggestions will not only enhance the flavor of your Bisquick Sausage Balls, it will also encourage engaging conversations and a delightful dining experience. Who knew something so simple could pack such a punch? For more recipes and serving ideas, check out Bon Appétit or The Kitchn for inspiration!
Time breakdown for Bisquick Sausage Balls
Preparation time
Making Bisquick Sausage Balls is quick and easy! You’ll only need about 10 minutes to gather your ingredients and mix them together. Feel free to multitask—like prepping your baking sheet while the sausage chill in the bowl!
Cooking time
Once everything is mixed, pop them in the oven for 15-20 minutes. This is the hardest part—you’ll be tempted to sneak a taste while they bake. The aroma will waft through your kitchen, beckoning you!
Total time
In just 25-30 minutes, you’ll have delicious Bisquick Sausage Balls ready to serve. Perfect for a party or a cozy night in! Looking for some creative dips to accompany your snack? Check out some great ideas over at Food Network for inspiration!
Nutritional Facts for Bisquick Sausage Balls
When diving into the tasty world of Bisquick Sausage Balls, it’s essential to understand what you’re enjoying nutritionally. Let’s break it down:
Calories
Each serving of these delightful bites packs around 150 calories. If you’re looking for a satisfying snack without going overboard, these are a solid choice.
Protein
Protein lovers will appreciate that Bisquick Sausage Balls contain approximately 7 grams of protein per serving, making them a great option for a quick breakfast or midday pick-me-up. Adding turkey bacon not only boosts flavor but protein as well!
Sodium
While delicious, it’s good to be mindful of sodium intake; these sausage balls have about 350 mg of sodium per serving. For a healthier twist, consider using lower-sodium options for your favorite sausage.
Indulging in Bisquick Sausage Balls can easily fit into a balanced diet, especially when enjoyed in moderation. For more details about nutritional choices, check out Healthline or MyFitnessPal. Understanding your nutritional intake is key to enjoying treats while staying mindful of your overall health!
FAQs about Bisquick Sausage Balls
How can I adapt the Bisquick Sausage Balls recipe for dietary restrictions?
If you’re looking to modify the Bisquick Sausage Balls recipe to meet dietary needs, there are some great options. For a gluten-free version, substitute Bisquick with a gluten-free baking mix, which is readily available in many grocery stores. If you’re vegan, consider using plant-based sausage and a dairy-free cheese alternative. For those watching their sodium intake, omit the added salt and choose lower-sodium sausage choices.
What’s the best way to store leftovers?
Storing leftovers properly can help your Bisquick Sausage Balls stay fresh and delicious longer. Let them cool completely, then place them in an airtight container. They can be kept in the refrigerator for up to 3 days. For longer storage, consider freezing them; they can last up to three months in the freezer. Just reheat them in the oven or microwave when you’re ready to enjoy them again. (For additional food storage tips, check out the USDA’s website).
Can I use a different baking mix instead of Bisquick?
Absolutely! While Bisquick gives your sausage balls a delightful texture, you can experiment with other baking mixes or make your own. Options like Jiffy baking mix, or even a homemade blend of flour, baking powder, and salt, can work well. Keep in mind that the flavor and texture may vary slightly, but that’s what makes cooking fun—finding the perfect version that suits your taste!
Taking the time to perfect your Bisquick Sausage Balls can lead to fun, delicious results that everyone will love. Enjoy your cooking adventure!
Conclusion on Bisquick Sausage Balls
Recap of Why They’re Worth Making
Bisquick Sausage Balls are truly a game-changer for busy professionals. They’re quick to prepare, delicious, and perfect for any occasion—from brunch gatherings to last-minute snacks. The combination of savory sausage and flaky Bisquick creates a satisfying bite that’s both comforting and adaptable. Plus, you can easily substitute ingredients for personal tastes or dietary needs, making these bites as versatile as they are tasty.
Encouragement to Try the Recipe Yourself
If you haven’t tried making Bisquick Sausage Balls yet, now’s the perfect time! Gather your ingredients, invite a friend over, and enjoy preparing this delightful snack together. It’s a simple recipe that promises to deliver big flavors. You may just find a new favorite to share with loved ones, whether for game day or casual family get-togethers. Dive in and see why this recipe has become a staple in so many kitchens!
Bisquick Sausage Balls: Easy Beef Delight with Turkey Bacon

Easy and delicious recipe for Bisquick Sausage Balls made with turkey bacon.
- Prep Time: 15 minutes
- Cook Time: 25 minutes
- Total Time: 40 minutes
- Yield: 24 servings 1x
- Category: Appetizer
- Method: Baking
- Cuisine: American
- Diet: Gluten-Free
Ingredients
- 2 cups Bisquick mix
- 1 pound turkey bacon
- 1 cup shredded cheddar cheese
- 1/2 cup milk
- 1 teaspoon garlic powder
- 1 teaspoon onion powder
Instructions
- Preheat your oven to 350°F (175°C).
- In a large mixing bowl, combine the Bisquick mix, turkey bacon, cheddar cheese, milk, garlic powder, and onion powder.
- Mix until well combined.
- Form the mixture into small balls and place on a baking sheet.
- Bake for 20-25 minutes or until golden brown.
Notes
- These sausage balls can be frozen for later use.
- Experiment with different types of cheese for variations.
Nutrition
- Serving Size: 3 balls
- Calories: 150
- Sugar: 1g
- Sodium: 300mg
- Fat: 10g
- Saturated Fat: 3g
- Unsaturated Fat: 5g
- Trans Fat: 0g
- Carbohydrates: 12g
- Fiber: 1g
- Protein: 8g
- Cholesterol: 30mg
Keywords: Bisquick Sausage Balls, Turkey Bacon, Easy Recipe